Mazda 3 Service Manual: Input/Turbine Speed Sensor Inspection [FS5 A EL]
CAUTION:
-
Water or foreign objects entering the connector can cause a poor connection or corrosion. Be sure not to drop water or foreign objects on the connector when disconnecting it.
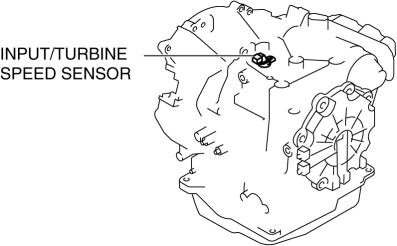
On-Vehicle Inspection
1. Perform the following procedures.
a. Remove the battery cover..
b. Disconnect the negative battery cable.
c. Remove the air cleaner component..
d. Disconnect the input/turbine speed sensor connector.
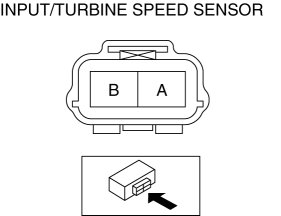
2. Measure the resistance between the input/turbine speed sensor terminals A and B.
-
If there is any malfunction, replace the input/turbine speed sensor..
-
Input/turbine speed sensor specification
-
250—600 ohms
Off-Vehicle Inspection
1. Measure the resistance between the input/turbine speed sensor terminals A and B.
-
If there is any malfunction, replace the input/turbine speed sensor..
-
Input/turbine speed sensor specification
-
250—600 ohms
 Boost Air Temperature Sensor Inspection [Mzr 2.3 Disi Turbo]
Resistance Inspection
NOTE:
Because the boost air temperature sensor is integrated in the MAP sensor,
replacing the boost air temperature sensor includes replacement of the MAP sensor/boos ...
 Input/Turbine Speed Sensor Removal/Installation [FS5 A EL]
CAUTION:
Always use a new bolt. If the removed input/turbine speed sensor installation
bolt is reused, it may cause oil leakage.
A sealant coating is applied to the input/turbine s ...
Other materials:
Vacuum Pump Inspection [Skyactiv G 2.0]
1. Pinch open the clamp using pliers and disconnect the vacuum hose from the
vacuum pump.
2. Install the vacuum gauge as shown in the figure, then check the vacuum.
3. Warn up the engine.
If the pressure is less than the specification, inspect for the following.
M ...
Antenna Feeder No.6 Inspection
1. Disconnect the negative battery cable..
2. Remove the following parts:
a. Upper panel.
b. Shift knob (MTX).
c. Selector lever knob (ATX).
d. Shift panel.
e. Side wall.
f. Console.
g. Car-navigation unit.
3. Verify that the continuity between antenna feeder No.6 terminals is as i ...
Headlight Leveling Actuator Inspection
NOTE:
Headlight leveling actuator are integrated with the front combination light.
For the actuator inspection of the headlight auto leveling system, perform
the headlight leveling actuator operation inspection..
1. Measure the voltage at each terminal is as indicated in the ...
