Mazda 3 Service Manual: License Plate Light Removal/Installation
1. Disconnect the negative battery cable..
2. Remove the lens..
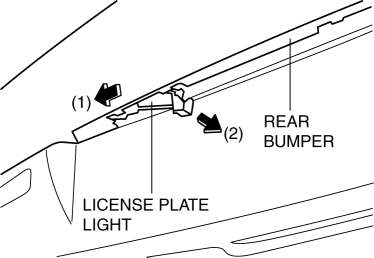
3. Insert a tape-wrapped fastener remover to the position shown in the figure, release the tabs.

4. Pull the rear bumper in the direction of the arrow (1) in the figure, and pull out the license plate lights in the direction of the arrow (2).
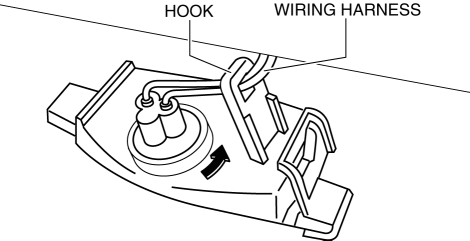
5. Pull out the wiring harness in the direction of the arrow and set it aside from the hook.
6. Remove the license plate light.
7. Install in the reverse order of removal.
 License Plate Light Bulb Removal/Installation
1. Disconnect the negative battery cable..
2. Insert a tape-wrapped fastener remover to the position shown in the figure,
release the tabs, and remove the lens.
3. Remove the license plate l ...
 PID/Data Monitor Inspection [Afs (Adaptive Front Lighting System)]
1. Connect the M-MDS (IDS) to the DLC-2.
2. After the vehicle is identified, select the following items from the initialization
screen of the IDS.
a. Select “DataLogger”.
b. Select “ ...
Other materials:
Rear Door Latch And Lock Actuator Inspection
1. The following actuator and switch are integrated with the rear door latch
and lock actuator. Inspect the rear door latch and lock actuator according to each
inspection procedure for the following items.
Rear door lock actuator.
Rear door latch switch.
Rear door lock-li ...
Roof Carrier Bracket Removal/Installation
4SD
1. Disconnect the negative battery cable..
2. Remove the following parts:
a. Sunroof seaming welt (vehicles with sunroof)
b. Front scuff plate.
c. Rear scuff plate.
d. A-pillar trim.
e. B-pillar lower trim.
f. Upper anchor of the front seat belt installation bolt.
g. B-pillar up ...
Manual Transaxle Shift Mechanism Removal/Installation [G35 M R]
1. Remove the battery cover..
2. Disconnect the negative battery cable.
3. Remove the battery component. (ex: battery, battery tray and PCM component).
4. Remove the air cleaner component..
5. Remove the aerodynamic under cover NO.2..
6. Remove the tunnel member (rear)..
7. Remove the u ...
