Mazda 3 Service Manual: Liftgate Hinge Removal/Installation
1. Disconnect the negative battery cable..
2. Remove the following parts:
a. Rear scuff plate.
b. Rear seat cushion.
c. Rear seat back.
d. Lower anchor installation bolts on the rear seat belt.
e. Tire house trim.
f. Trunk end trim.
g. Trunk side upper trim.
h. Trunk side trim.
i. C-pillar trim.
j. Rear assist handle.
k. Liftgate.
3. Remove the nut while partially peeling back the headliner.
NOTE:
-
Be careful not to leave a fold-seam.
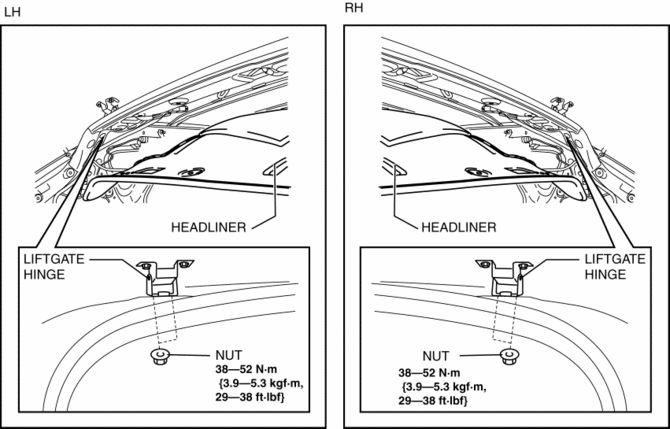
4. Remove the liftgate hinge.
5. Install in the reverse order of removal.
 Liftgate Adjustment
1. Measure the gap and height difference between the liftgate and the body.
2. Loosen the liftgate hinge installation bolts and adjust the gap by moving
the liftgate.
Standard clearance
...
 Liftgate Latch And Lock Actuator Inspection
1. The following actuator and switch are integrated with the liftgate latch and
lock actuator. Inspect the liftgate latch and lock actuator according to each inspection
procedure for the following ...
Other materials:
RCD (Rear Camera Detection)
When reversing the Subaru Solterra, the rear camera detection system
actively monitors the area behind the vehicle and is capable of identifying pedestrians
within its coverage zone.
If a pedestrian is recognized, the Subaru Solterra immediately alerts
the driver by sounding an audible warnin ...
Rear View Monitor
The rear view monitor provides visual images of the rear of the vehicle when
reversing.
WARNING
Always drive carefully confi rming the safety of the rear and the
surrounding conditions
by looking directly with your eyes:
Reversing the vehicle by only looking at the screen is d ...
Side Air Bag Sensor No. 1 Removal/Installation [Two Step Deployment Control
System]
WARNING:
Handling the side air bag sensor improperly can accidentally operate (deploy)
the air bag module, which may seriously injure you. Read the air bag system
service warnings and cautions before handling the side air bag sensor..
1. Switch the ignition to off.
2. Disconnec ...
