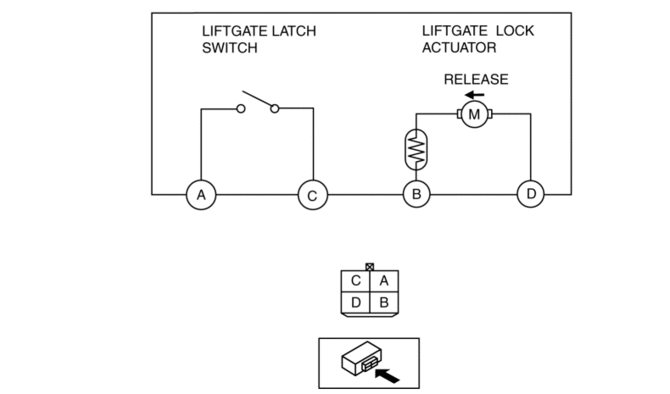
Mazda 3 Service Manual: Liftgate Latch And Lock Actuator Inspection
1. The following actuator and switch are integrated with the liftgate latch and lock actuator. Inspect the liftgate latch and lock actuator according to each inspection procedure for the following items.
-
Liftgate latch switch.
-
Liftgate lock actuator.
 Liftgate Hinge Removal/Installation
1. Disconnect the negative battery cable..
2. Remove the following parts:
a. Rear scuff plate.
b. Rear seat cushion.
c. Rear seat back.
d. Lower anchor installation bolts on the rear seat be ...
 Liftgate Latch And Lock Actuator Removal/Installation
1. Disconnect the negative battery cable..
2. Remove the following parts:
a. Liftgate upper trim.
b. Liftgate side trim.
c. Liftgate lower trim.
3. Disconnect the connector.
4. Remove ...
Other materials:
Trunk Lid Adjustment
1. Measure the gap and height difference between the trunk lid and the body.
Standard clearance
a: 2.4—4.4 mm {0.10—0.17 in}
b: -4.6—-2.6 mm {-0.18—-0.11 in}
c: 2.5—4.5 mm {0.10—0.17 in}
d: -1.7—0.3 mm {-0.06—0.01 in}
e: 2.6—4.6 mm {0. ...
Automatic Transaxle Removal/Installation [Fw6 A EL]
CAUTION:
Secure the steering wheel using tape or a cable to prevent the steering shaft
from rotating after disconnecting the steering shaft. If the steering wheel
rotates after the steering shaft and the steering gear and linkage are disconnected,
the internal parts of the clock spr ...
Spark Plug Inspection [Mzr 2.3 Disi Turbo]
Specification
Spark plug type
L3BD-18110, L3YD-18110
Plug Gap Inspection
CAUTION:
To avoid possible damage to the tip, do not adjust the plug gap.
To prevent damaging the tip, use a wire type plug gap gauge when inspecting
the plug gap.
1. Measure the spark p ...
