Subaru Solterra 2023-2026 Owner's Manual: Locking and unlocking AC charging connector
When the AC charging connector is properly inserted into the charging inlet of the Subaru Solterra, it is automatically secured in place to prevent accidental disconnection during the charging process. This locking mechanism ensures a stable and safe connection while charging is in progress.
In the Subaru Solterra, the locking and unlocking of the AC charging connector is directly synchronized with the vehicle’s door lock status. Once the connector is inserted, its lock state changes automatically depending on whether the doors are locked or unlocked.
Locking and unlocking the AC charging connector
■ Locking the charging connector
When the doors of the Subaru Solterra are locked while the AC charging connector is connected, the connector will also lock automatically. Likewise, if the connector is already inserted and the doors are subsequently locked, the system engages the connector lock without requiring additional input.
This automatic locking feature helps protect the charging cable from being removed unintentionally or without authorization.
■ Unlocking the charging connector
To release the AC charging connector from the Subaru Solterra, simply unlock the vehicle doors. Once unlocked, the connector lock disengages, allowing safe removal of the charging cable.
■ AC charging connector lock function
If the locking and unlocking operation of the AC charging connector in the Subaru Solterra is performed repeatedly within a short period, the system may temporarily disable the function as a protective measure.
In such situations, wait briefly before attempting to reconnect the AC charging connector to the charging inlet.
It should be noted that while the connector lock function adds a level of security, it does not guarantee complete protection against theft or tampering in all situations.
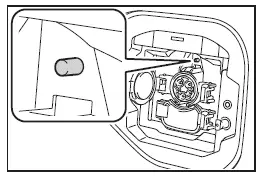
■ When the AC charging connector cannot be inserted into the AC charging inlet
If insertion of the AC charging connector into the Subaru Solterra is not possible, inspect the connector lock pin to ensure it is not extended.
If the lock pin is extended, this indicates that the connector lock is active.
Unlock the vehicle using the smart key system or remote control to release the connector lock, and confirm that the lock pin has retracted before attempting insertion again.
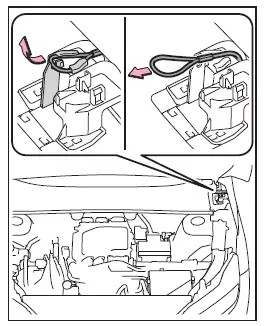
■ If the AC charging connector cannot be unlocked
If the AC charging connector remains locked and cannot be removed using normal procedures, the Subaru Solterra provides an emergency release mechanism.
1. Open the hood of the Subaru Solterra.
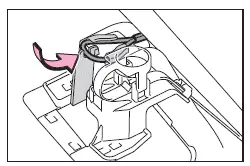
2. Locate and pull the emergency release wire.
This action will manually disengage the locking mechanism, allowing the AC charging connector to be safely removed.
3. After releasing the connector, secure the handle of the emergency release wire back into its designated attachment point.
This emergency procedure is intended for temporary use only. If the issue persists, the Subaru Solterra should be inspected by an authorized SUBARU dealer as soon as possible.
Avoid using the emergency release wire if the charging connector can be unlocked through normal operation.
WARNING
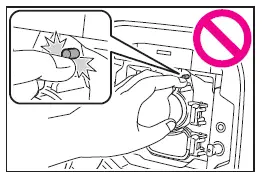
■ When connecting the AC charging connector to the AC charging inlet
- Never place your hand near or inside the connector lock mechanism of the Subaru Solterra. The locking pin may move unexpectedly and cause injury.
NOTICE
■ When locking the AC charging connector
Follow the precautions below to ensure proper operation of the Subaru Solterra charging connector locking system.
Failure to comply may result in malfunction or improper locking.
- Ensure that the AC charging connector being used is fully compatible
with the Subaru Solterra.
Using a damaged, deformed, or incompatible connector may prevent proper locking.
- Avoid applying excessive force to the AC charging connector once it has
been inserted.
Before removing the connector, always unlock it properly to prevent damage to the locking mechanism.
Understanding how the Subaru Solterra charging connector locking system works ensures safe charging operations, protects equipment from damage, and helps maintain reliable long-term performance.
 AC charging cable
This section explains the functionality, proper handling procedures,
and safety considerations for the AC charging cable used with the Subaru Solterra,
ensuring efficient and secure charging in ev ...
 Power sources that can be used
To properly charge the Subaru Solterra, it is essential to use an
external power source that fully meets the specified electrical requirements. Always
verify that the selected power source complie ...
Other materials:
Front Seat Cushion Trim Removal/Installation
WARNING:
Handling a front seat (with built-in side air bag) improperly can accidentally
operate (deploy) the air bag, which may seriously injure you. Read the service
warnings before handling a front seat (with built-in side air bag)..
CAUTION:
After removing a front seat ...
Manifold Absolute Pressure (Map) Sensor/Boost Air Temperature Sensor Removal/Installation
[Mzr 2.3 Disi Turbo]
NOTE:
Because the boost air temperature sensor is integrated in the MAP sensor,
replacing the boost air temperature sensor includes replacement of the MAP sensor/boost
air temperature sensor.
1. Remove the battery cover..
2. Disconnect the negative battery cable..
3. Remove t ...
Antenna Feeder No.1 Inspection
1. Disconnect the negative battery cable..
2. Remove the following parts:
a. Center panel.
b. Audio unit.
c. A-pillar trim (RH).
3. Disconnect antenna feeder No.2.
4. Verify that the continuity between antenna feeder No.1 terminals is as indicated
in the table.
If not a ...
