Mazda 3 Service Manual: Oil Filter Replacement [Mzr 2.0, Mzr 2.5]
WARNING:
-
Hot engines and engine oil can cause severe burns. Turn off the engine and wait until it and the engine oil have cooled.
-
A vehicle that is lifted but not securely supported on safety stands is dangerous. It can slip or fall, causing death or serious injury. Never work around or under a lifted vehicle if it is not securely supported on safety stands.
-
Continuous exposure to USED engine oil has caused skin cancer in laboratory mice. Protect your skin by washing with soap and water immediately after working with engine oil.
CAUTION:
-
If engine oil is spilled on the exhaust system, wipe it off completely. If you fail to wipe the spilled engine oil, it will produce fumes because of the heat.
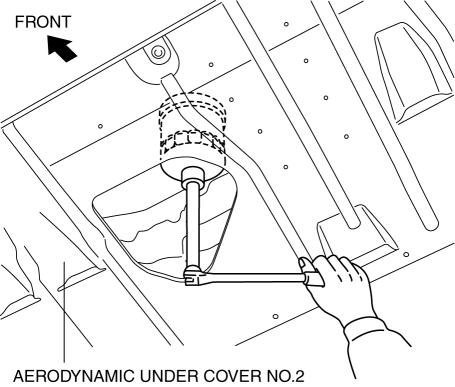
1. Remove the oil filter using a commercially available, cup-type oil filter wrench (76 mm {3.0 in} diameter, 15 sided
).

2. Use a clean rag to wipe off the mounting surface.
3. Apply clean engine oil to the O-ring of a new oil filter.
4. Tighten the oil filter according to the instructions on the package or side of the oil filter.
-
Tightening torque (reference value)
-
15—20 N·m {1.6—2.0 kgf·m, 12—14 ft·lbf}
5. Start the engine and confirm that there is no oil leakage.
-
If there is oil leakage, repair or replace the applicable part.
6. Inspect the oil level..
 Oil Cooler Removal/Installation [Mzr 2.0, Mzr 2.5]
WARNING:
Hot engines and engine oil can cause severe burns. Turn off the engine and
wait until it and the engine oil have cooled.
A vehicle that is lifted but not securely supported ...
 Oil Pan Removal/Installation [Mzr 2.0, Mzr 2.5]
WARNING:
Hot engines and engine oil can cause severe burns. Turn off the engine and
wait until it and the engine oil have cooled.
A vehicle that is lifted but not securely supported ...
Other materials:
PCM Configuration [Mzr 2.0, Mzr 2.5]
CAUTION:
If the wheel and tire sizes are changed, a discrepancy with the speedometer
needle whereby it exceeds the allowable range could result in a malfunction.
If the wheel and tire sizes are changed, perform the following procedure to
change the tire size parameter setting..
...
Ignition Coil Inspection [Mzr 2.0, Mzr 2.5]
Ignition Coil Inspection
1. Perform the spark test and identify the malfunctioning cylinder..
2. Replace the ignition coil of the malfunctioning cylinder with that of a normal
cylinder, and perform the spark test again..
If the spark is not normal due to a malfunctioning ignition coil, ...
B Pillar Lower Trim Removal/Installation
1. Remove the front scuff plate..
2. Remove the rear scuff plate..
3. Partially peel back the seaming welt.
4. Pull the B-pillar lower trim in the direction of the arrow (1), (2) shown
in the figure, detach tab A, pin B, pin C, clip D.
5. Remove the B-pillar lower trim in the direction ...
