Mazda 3 Service Manual: Oil Cooler Removal/Installation [Mzr 2.0, Mzr 2.5]
WARNING:
-
Hot engines and engine oil can cause severe burns. Turn off the engine and wait until it and the engine oil have cooled.
-
A vehicle that is lifted but not securely supported on safety stands is dangerous. It can slip or fall, causing death or serious injury. Never work around or under a lifted vehicle if it is not securely supported on safety stands.
-
Continuous exposure to USED engine oil has caused skin cancer in laboratory mice. Protect your skin by washing with soap and water immediately after working with engine oil.
1. Remove the battery cover..
2. Disconnect the negative battery cable..
3. Remove the aerodynamic under cover No.2..
4. Drain the engine coolant..
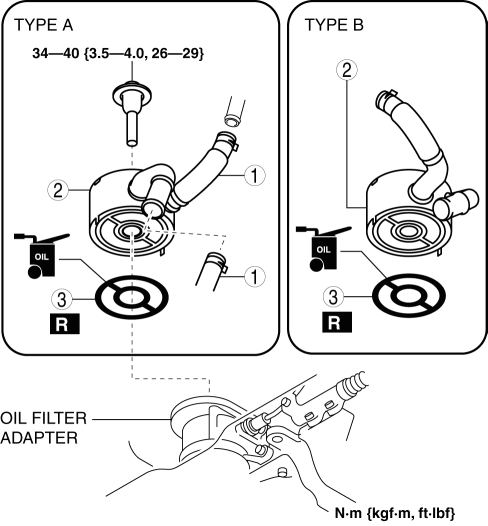
5. Remove in the order indicated in the table.
6. Use a clean rag to wipe off the mounting surface on the oil filter adapter and the oil cooler.
7. Install in the reverse order of the removal.
8. Refill the engine coolant..
9. Start the engine and confirm that there is no oil leakage.
-
If there is oil leakage, repair or replace the applicable part.
10. Inspect the oil level..
11. Inspect for engine coolant leakage..
|
1 |
Water hose |
|
2 |
Oil cooler (See Oil Cooler Installation Note.) |
|
3 |
Gasket (See Gasket Installation Note.) |
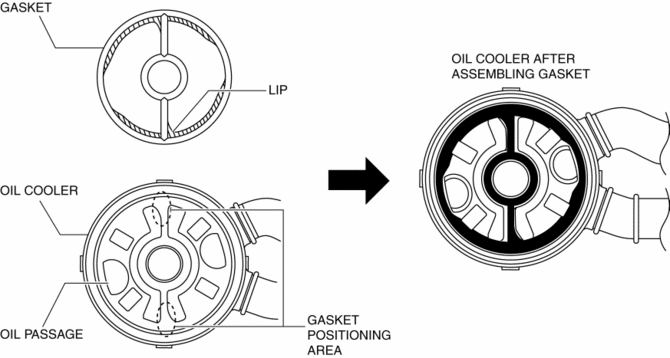
Gasket Installation Note
1. Apply engine oil to a new gasket.
CAUTION:
-
Assemble the gasket to the correct position using the following procedure so that the gasket lip does not overlap the oil passage for the oil cooler. Otherwise, it could leak engine oil and damage the engine.
2. Align the gasket lip to the gasket positioning areas of the oil cooler and assemble the gasket to the oil cooler.
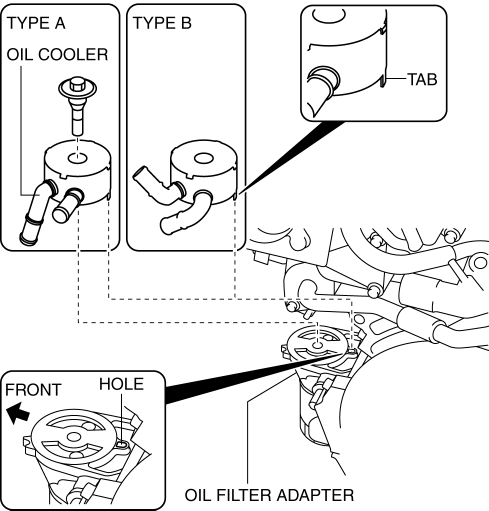
Oil Cooler Installation Note
1. Align one of the positioning tabs on the oil cooler as shown in the figure to the oil filter adapter hole, and install the oil cooler.
 Oil Cooler Removal/Installation [Fw6 A EL]
1. Remove the battery cover..
2. Disconnect the negative battery cable..
3. Remove the aerodynamic under cover NO.2..
4. Drain the ATF..
5. Drain the engine coolant..
6. Remove in the order ...
 Oil Filter Replacement [Mzr 2.0, Mzr 2.5]
WARNING:
Hot engines and engine oil can cause severe burns. Turn off the engine and
wait until it and the engine oil have cooled.
A vehicle that is lifted but not securely supported ...
Other materials:
Cylinder Head Gasket Replacement [Mzr 2.0, Mzr 2.5]
WARNING:
Fuel vapor is hazardous. It can very easily ignite, causing serious injury
and damage. Always keep sparks and flames away from fuel.
Fuel line spills and leakage are dangerous. Fuel can ignite and cause serious
injuries or death and damage. Fuel can also irritate skin ...
Ion Sensor Inspection [Skyactiv G 2.0]
DTC Inspection
NOTE:
Because the ion sensor is integrated in the ignition coil, replacing the
ion sensor includes replacement of the ignition coil/ion sensor.
1. Connect the M-MDS to the DLC-2.
2. Perform the DTC inspection using the M-MDS..
If any DTC related to the ...
B Pillar Upper Trim Removal/Installation
1. Remove the following parts:
a. Adjuster anchor cover.
b. Upper anchor installation bolts on the front seat belt.
c. Front scuff plate.
d. Rear scuff plate.
2. Partially peel back the seaming welt.
3. Remove the B-pillar lower trim..
4. Grasp the lower end of the B-pillar upper trim, ...
