Mazda 3 Service Manual: Oil Cooler Removal/Installation [Fw6 A EL]
1. Remove the battery cover..
2. Disconnect the negative battery cable..
3. Remove the aerodynamic under cover NO.2..
4. Drain the ATF..
5. Drain the engine coolant..
6. Remove in the order indicated in the table.
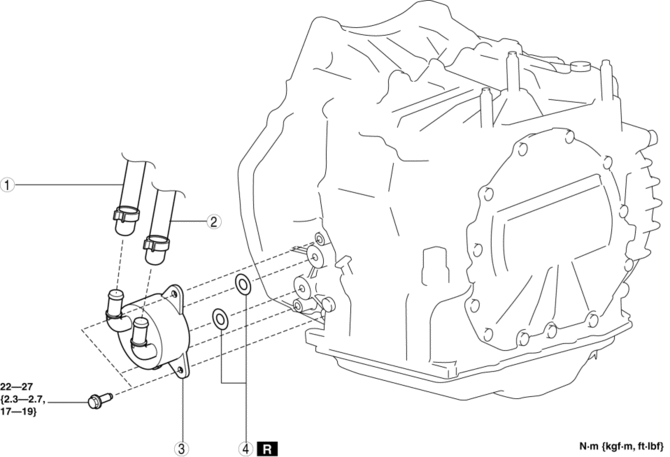
|
1 |
Water hose (connected to the water pipe) |
|
2 |
Water hose (connected to the outlet) |
|
3 |
Water-cooled oil cooler |
|
4 |
O-rings |
7. Install in the reverse order of removal.
8. Add the engine coolant..
9. Add the ATF..
10. Perform the “Mechanical System Test”..
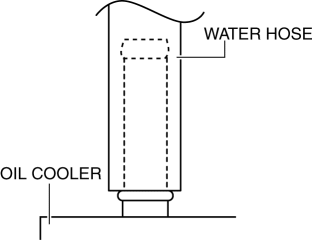
Water Hose Installation Note
1. Install the water hose to the oil cooler as shown in the figure with the hose clamp expanded.
NOTE:
-
A new water hose and hose clamp are attached.
2. Install the hose clamp to the position shown in the figure.
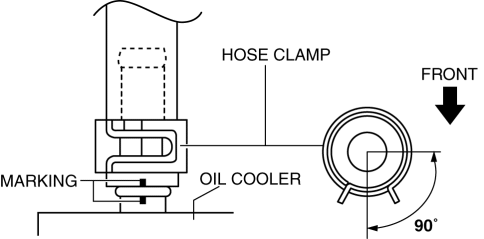
-
Verify that the installation angle of the hose clamp is within the range shown in the figure.
3. Verify that the hose clamp does not interfere with any other components.
 Oil Cooler Removal/Installation [FS5 A EL]
1. Remove the battery cover..
2. Disconnect the negative battery cable.
3. Remove the air cleaner component..
4. Remove the aerodynamic under cover NO.2..
5. Drain the ATF..
6. Drain the eng ...
 Oil Cooler Removal/Installation [Mzr 2.0, Mzr 2.5]
WARNING:
Hot engines and engine oil can cause severe burns. Turn off the engine and
wait until it and the engine oil have cooled.
A vehicle that is lifted but not securely supported ...
Other materials:
Shift Lock System Inspection
Shift-Lock System Inspection
1. Switch the ignition to ON.
2. Shift the selector lever to the P position.
3. Perform the following procedures to inspect the shift-lock system.
If there is any malfunction, inspect the shift-lock solenoid and P position
switch..
a. Verify that th ...
Installation Of Radio System
The control modules and control unit have been designed with sufficient attention
to radio wave disturbances from the outside. However, observe the following precautions
when installing the radio set to the vehicle to prevent adverse effects on the control
modules and control unit.
Inst ...
Seat Weight Sensor Calibration [Two Step Deployment Control System]
CAUTION:
If any of the following work is performed, perform the seat weight sensor
calibration using the M-MDS.
Replacement with a new seat weight sensor
Replacement with a new seat weight sensor control module
Replacement with new passenger-side seat pa ...
