Mazda 3 Service Manual: Oil Cooler Removal/Installation [FS5 A EL]
1. Remove the battery cover..
2. Disconnect the negative battery cable.
3. Remove the air cleaner component..
4. Remove the aerodynamic under cover NO.2..
5. Drain the ATF..
6. Drain the engine coolant..
7. Remove in the order indicated in the table.

|
1 |
Water hose (connected to the outlet) |
|
2 |
Water hose (connected to the thermostat) |
|
3 |
Oil hose (See Oil Hose Installation Note.) |
|
4 |
Hose clamp (See Oil Hose Installation Note.) |
|
5 |
Connector bolt |
|
6 |
Packing |
|
7 |
Oil cooler |
8. Install in the reverse order of removal.
9. Add the engine coolant..
10. Add the ATF..
11. Perform the “Mechanical System Test”..
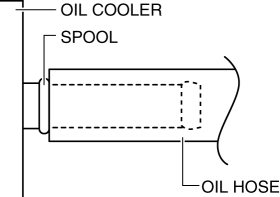
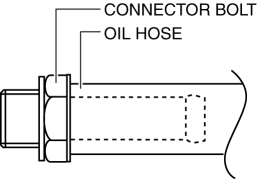
Oil Hose Installation Note
1. Install the oil hose.
-
Oil cooler side
-
Install the oil hose into the oil cooler to the position shown in the figure.
-
Connector bolt side
-
Install the oil hose into the connector bolt to the position shown in the figure.
2. Install the hose clamp within the marked area of the oil hose.
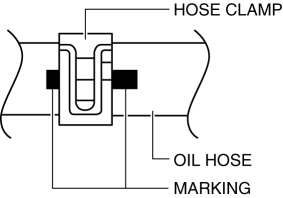
NOTE:
-
If the oil hose is to be re-used, install the hose clamp to the impression in the hose left by the previous installation. After installation, apply force to the hose clamp in the direction of the arrows to engage the hose clamp securely.
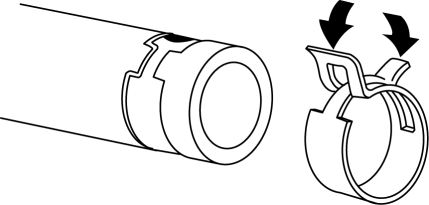
3. Verify that the hose clamp does not interfere with any other components.
 Oil Cooler Flushing [FS5 A EL]
NOTE:
If the automatic transaxle is replaced, flush and inspect the oil cooler.
When replacing the automatic transaxle, inspect the oil cooler together with
flushing it using the fo ...
 Oil Cooler Removal/Installation [Fw6 A EL]
1. Remove the battery cover..
2. Disconnect the negative battery cable..
3. Remove the aerodynamic under cover NO.2..
4. Drain the ATF..
5. Drain the engine coolant..
6. Remove in the order ...
Other materials:
Back door
In the Subaru Solterra, the back door can be conveniently locked,
unlocked, opened, and closed using several intuitive methods, ensuring both ease
of use and a high level of safety during everyday operation.
WARNING
Carefully follow all safety precautions when operating the Subaru Solterra
b ...
Clutch Disc Inspection [C66 M R]
Operation Inspection
1. Inspect the lining surface for discoloration and grease adhesion.
2. Inspect the torsion spring for weakness and the rivet for looseness.
3. Using a vernier caliper, measure the depth between the lining surface and
the rivet head.
Minimum clutch disc thickness ...
Hydraulic Variable Valve Timing Actuator Inspection [Skyactiv G 2.0]
WARNING:
A hot engine can cause severe burns. Turn off the engine and wait until it
is cool before servicing.
CAUTION:
Do not disassemble the hydraulic variable valve timing actuator because it
is a precision unit.
1. Remove the battery cover..
2. Disconnect the n ...
