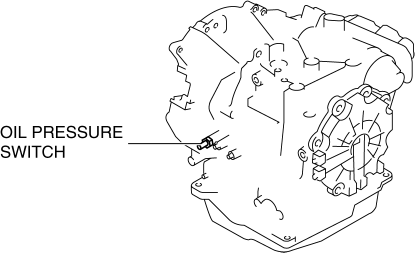
Mazda 3 Service Manual: Oil Pressure Switch Inspection [FS5 A EL]
CAUTION:
-
Water or foreign objects entering the connector can cause a poor connection or corrosion. Be sure not to drop water or foreign objects on the connector when disconnecting it.
On-Vehicle Inspection
1. Perform the following procedures.
a. Remove the aerodynamic under cover NO.2..
b. Disconnect the oil pressure switch connector.
2. Start the engine.
3. Inspect the continuity between the oil pressure switch terminal A and body GND.
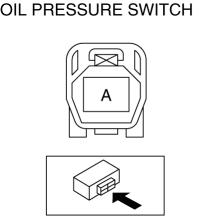
-
If there is any malfunction, replace the oil pressure switch..
|
Test Condition |
Continuity |
|
In P position |
No continuity |
|
In R position |
No continuity |
|
In N position |
No continuity |
|
In D position |
Continuity |
Off-Vehicle Inspection
1. Apply air pressure at 400—440 kPa {4.08—4.48 kgf/cm2,58.1—63.8 psi} as shown in the figure.
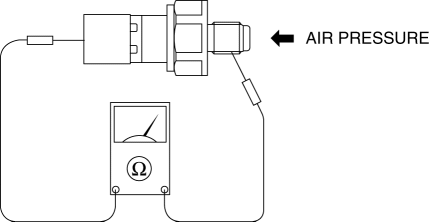
2. Inspect continuity between the oil pressure switch terminal A and screw part.
-
If there is any malfunction, replace the oil pressure switch..
|
Test Condition |
Continuity |
|
Applying air pressure |
Continuity |
|
Applying no air pressure |
No continuity |
 Oil Pressure Switch Inspection
MZR 2.0, MZR 2.5, MZR 2.3 DISI Turbo
WARNING:
A hot engine can cause severe burns. Turn off the engine and wait until it
is cool before removing the exhaust system.
1. Disconnect the ...
 Oil Pressure Switch Removal
MZR 2.0, MZR 2.5, MZR 2.3 DISI Turbo
WARNING:
A hot engine can cause severe burns. Turn off the engine and wait until it
is cool before removing the exhaust system.
1. Disconnect the ...
Other materials:
Heater Core Inspection
1. Inspect the heater core for damage, cracks, and water leakage.
If there is any malfunction, replace the heater core.
2. Visually inspect the fins for bending.
If there is any bending, use the end of a flathead screwdriver to straighten
the fins.
3. Visually inspect ...
Clutch Unit Removal/Installation [C66 M R]
1. Remove the battery cover..
2. Disconnect the negative battery cable..
3. Remove the aerodynamic under cover No.2 and the splash shield as a single
unit..
4. Drain the manual transaxle oil..
5. Disconnect and/or remove the following parts in the engine compartment.
a. Remove the batte ...
Driving Tips
WARNING
Do not let the vehicle move in a
direction opposite to the direction
selected by the selector lever:
Do not let the vehicle move backward
with the selector lever in a forward
position, or do not let the vehicle
move forward with the selector lever
in the revers ...
