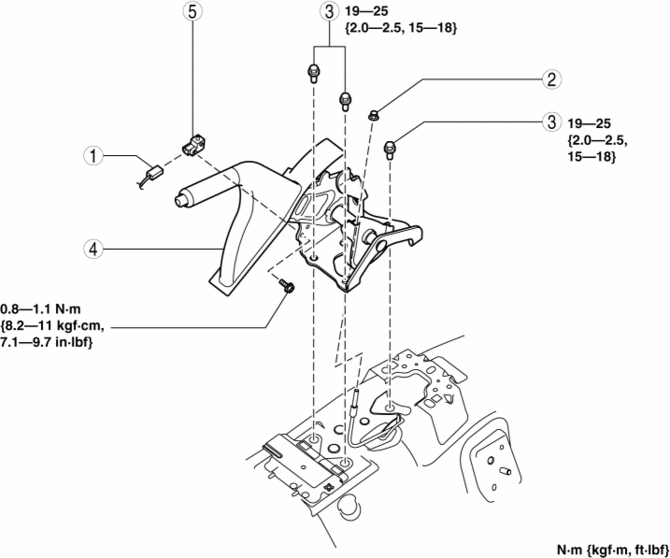
Mazda 3 Service Manual: Parking Brake Lever Removal/Installation
1. Remove the following parts:
a. Upper panel.
b. Shift knob (MTX).
c. Selector lever knob (ATX).
d. Shift panel.
e. Side wall.
f. Console.
2. Remove in the order indicated in the table.
3. Install in the reverse order of removal.
4. After installation, inspect the parking brake lever stroke..
|
1 |
Parking brake switch connector |
|
2 |
Adjusting nut |
|
3 |
Bolt |
|
4 |
Parking brake lever |
|
5 |
Parking brake switch |
 Parking Brake Lever Inspection
Stroke Inspection
1. Pump the brake pedal a few times.
2. Pull the parking brake lever two to three times.
3. Inspect the parking brake stroke by slowly pulling at point A 50 mm {1.97
in} from ...
 Parking Brake Switch Inspection
1. Remove the upper panel..
2. Disconnect the parking brake switch connector.
3. Verify that the continuity is as indicated in the table.
If not as indicated in the table, replace the ...
Other materials:
Power Window Lock Switch
This feature prevents all power windows
from operating, except the driver's power
window. Keep this switch in the locked
position while children are in the vehicle.
Locked position (button depressed):
Only the driver's power window can be
operated.
Unlocked position (button not
depressed ...
Operating Tips for CD Player
Condensation phenomenon
Immediately after turning on the heater
when the vehicle is cold, the CD or
optical components (prism and lens) in
the CD player may become clouded with
condensation. At this time, the CD will
eject immediately when placed in the unit.
A clouded CD can be corrected s ...
Tire information
Typical tire symbols
Location of treadwear indicators
Maximum load rating at the specified cold tire pressure for the Subaru Solterra
Maximum cold tire inflation pressure
This value indicates the highest pressure level permitted for safe tire inflation.
Tire size designation used ...
