Mazda 3 Service Manual: Power Window Motor Removal/Installation
Front Power Window Motor
1. Fully lower the front door glass.
2. Disconnect the negative battery cable..
3. Remove the inner garnish..
4. Remove the front door trim..
5. Remove the front door speaker..
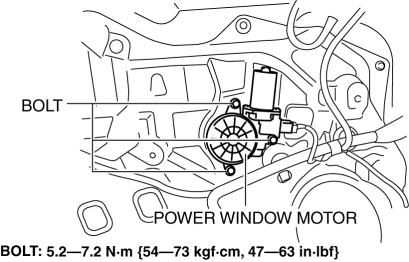
6. Remove the bolts.

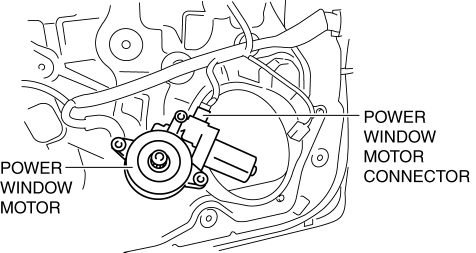
7. Disconnect the front power window motor connector.

8. Install in the reverse order of removal.
NOTE:
-
When installing the front power window motor to the front power window regulator drum, the drum housing hooks may detach from the door module. If this happens, remove the front door speaker, insert your hand in the speaker installation hole, connect the drum housing hooks, and while supporting the drum housing, install the front power window motor to the drum.
Rear Power Window Motor
1. Fully lower the rear door glass.
2. Disconnect the negative battery cable..
3. Remove the rear door trim..
4. Remove the rear door speaker..
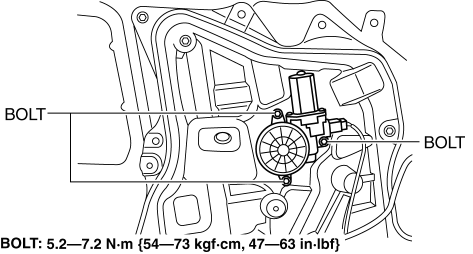
5. Remove the bolts.

6. Disconnect the front power window motor connector.

7. Install in the reverse order of removal.
NOTE:
-
When installing the rear power window motor to the rear power window regulator drum, the drum housing hooks may detach from the door module. If this happens, remove the door speaker, insert your hand in the speaker installation hole, connect the drum housing hooks, and while supporting the drum housing, install the rear power window motor to the drum.
 Power Window Motor Inspection
Front Driver Side
1. Disconnect the negative battery cable..
2. Remove the inner garnish..
3. Remove the front door trim..
4. Disconnect the power window motor connector.
5. Apply battery pos ...
 Power Window Subswitch Inspection
Passenger's Side
1. Disconnect the negative battery cable..
2. Remove the inner garnish..
3. Remove the front door trim..
4. Remove the power window subswitch..
5. Verify that the continu ...
Other materials:
Radar Sensors (Rear)
The radar sensors (rear) for the rear vehicle monitoring system are equipped
inside the rear
bumper, one each on the left and right sides.
Sedan
Hatchback
The surface area of the rear bumper near the radar sensors (rear) should
always be clean so
that the rear vehicle monitoring sys ...
Front Door Speaker Removal/Installation
1. Disconnect the negative battery cable..
2. Remove the inner garnish..
3. Remove the front door trim..
4. Disconnect the connector.
Without Bose®
With Bose®
5. Remove the screw.
6. Remove the front door speaker in the direction of the arrow shown in the figure.
Without Bose® ...
Exterior Care
The paintwork on your Mazda represents
the latest technical developments in
composition and methods of application.
Environmental hazards, however, can
harm the paint's protective properties, if
proper care is not taken.
Here are some examples of possible
damage, with tips on how to preve ...
