Mazda 3 Service Manual: Power Window Subswitch Inspection
Passenger's Side
1. Disconnect the negative battery cable..
2. Remove the inner garnish..
3. Remove the front door trim..
4. Remove the power window subswitch..
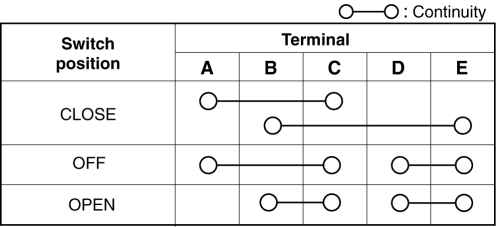
5. Verify that the continuity is as indicated in the table using a tester.
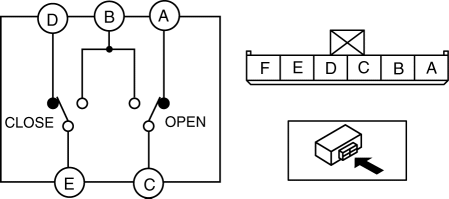
-
If not as indicated in the table, replace the power window subswitch.
Rear
1. Disconnect the negative battery cable..
2. Remove the rear door trim..
3. Remove the power window subswitch..
4. Verify that the continuity is as indicated in the table using a tester.
-
If not as indicated in the table, replace the power window subswitch.
 Power Window Motor Removal/Installation
Front Power Window Motor
1. Fully lower the front door glass.
2. Disconnect the negative battery cable..
3. Remove the inner garnish..
4. Remove the front door trim..
5. Remove the front door ...
 Power Window Subswitch Removal/Installation
Passenger's Side
1. Disconnect the negative battery cable..
2. Remove the inner garnish..
3. Remove the front door trim..
4. Remove the power window subswitch..
5. Install in the reverse ...
Other materials:
Manual Transaxle Shift Mechanism Removal/Installation [C66 M R]
1. Remove the battery cover..
2. Disconnect the negative battery cable..
3. Remove the shift lever.
a. Remove the upper panel..
b. Remove the shift lever knob.
c. Remove the shift panel..
d. Remove the side wall..
e. Remove the console..
f. Detach the clip as shown in the figure. ...
Antenna Feeder No.4 Removal/Installation
Removal
NOTE:
The antenna feeder No.4 is integrated with the dashboard wiring harness.
1. Refer to DASHBOARD DISASSEMBLY/ASSEMBLY.
Installation
CAUTION:
If the antenna feeder No.4 is installed with tension on the cable and wiring
harness it could result in loosening of t ...
How the SRS Air Bags Work
Your Mazda is equipped with the following types of SRS air bags. SRS air bags
are
designed to work together with the seat belts to help to reduce injuries during
an accident.
The SRS air bags are designed to provide further protection for passengers in
addition to the
seat belt functions. ...
