Mazda 3 Service Manual: Roof Carrier Bracket Removal/Installation
4SD
1. Disconnect the negative battery cable..
2. Remove the following parts:
a. Sunroof seaming welt (vehicles with sunroof)
b. Front scuff plate.
c. Rear scuff plate.
d. A-pillar trim.
e. B-pillar lower trim.
f. Upper anchor of the front seat belt installation bolt.
g. B-pillar upper trim.
h. Rear seat cushion.
i. Tire house trim.
j. C-pillar trim.
k. Map light.
l. Sunvisor.
m. Assist handle.
n. Headliner.
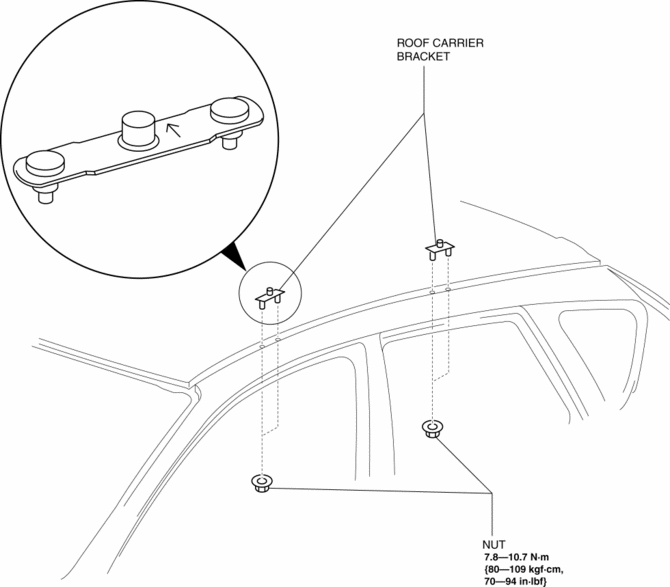
3. Remove the nuts.

4. Remove the roof carrier bracket.
5. Install in the reverse order of removal.
NOTE:
-
Install the roof carrier bracket so that the arrow on it faces inward.
5HB
1. Disconnect the negative battery cable..
2. Remove the following parts:
a. Sunroof seaming welt (vehicles with sunroof)
b. Front scuff plate.
c. Rear scuff plate.
d. A-pillar trim.
e. B-pillar lower trim.
f. Upper anchor of the front seat belt installation bolt.
g. B-pillar upper trim.
h. Rear seat cushion.
i. Tire house trim.
j. Trunk side upper trim.
k. C-pillar trim.
l. Map light.
m. Sunvisor.
n. Assist handle.
o. Headliner.
3. Remove the nuts.
4. Remove the roof carrier bracket.
5. Install in the reverse order of removal.
NOTE:
-
Install the roof carrier bracket so that the arrow on it faces inward.
 Oil Seal (Differential) Replacement [G66 M R]
1. On level ground, jack up the vehicle and support it evenly on safety stands.
2. Remove the aerodynamic under cover No.2..
3. Drain the oil from the transaxle..
4. Remove the front splash shi ...
 Driveshafts
...
Other materials:
Oil Control Valve (OCV) Removal/Installation [Mzr 2.0, Mzr 2.5]
1. Remove the battery cover..
2. Disconnect the negative battery cable..
3. Remove the plug hole plate..
4. Disconnect the wiring harness.
5. Remove the ignition coils..
6. Remove the ventilation hose.
7. Remove the oil level gauge.
8. Remove the cylinder head cover..
9. Remove in th ...
Automatic air conditioning system
In the Subaru Solterra, the automatic air conditioning system intelligently
regulates airflow distribution and fan speed in real time, ensuring that the interior
climate remains consistent with the selected temperature settings for maximum comfort
and efficiency.
Air conditioning controls
...
Caliper (Rear) Disassembly/Assembly
1. Disassemble in the order indicated in the table.
1
Dust seal
(See Dust Seal Assembly Note.)
2
Bleeder cap
3
Bleeder screw
4
Caliper body
2. Assemble in the reverse orde ...
