
Mazda 3 Service Manual: Oil Seal (Differential) Replacement [G66 M R]
1. On level ground, jack up the vehicle and support it evenly on safety stands.
2. Remove the aerodynamic under cover No.2..
3. Drain the oil from the transaxle..
4. Remove the front splash shield..
5. Separate the drive shaft and joint shaft from the transaxle..
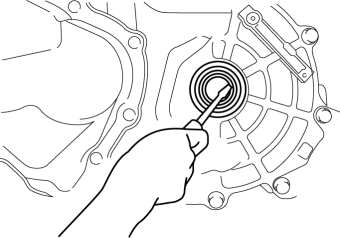
6. Remove the oil seals using a screwdriver.
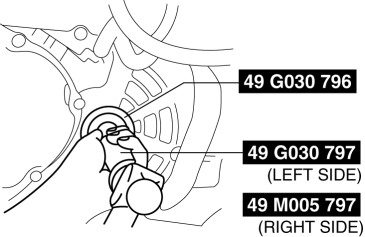
7. Using the SSTs
and a hammer, tap each new oil seal in evenly until the SST
contacts the transaxle case.
8. Coat the lip of each oil seal with transaxle oil.
9. Insert the drive shaft and joint shaft to the transaxle..
10. Install the front splash shield..
11. Add the specified amount and type of oil..
12. Install the aerodynamic under cover No.2..
 Oil Seal (Differential) Replacement [G35 M R]
1. On level ground, jack up the vehicle and support it evenly on safety stands.
2. Remove the aerodynamic under cover No.2..
3. Drain the oil from the transaxle..
4. Remove the front splash shi ...
 Roof Carrier Bracket Removal/Installation
4SD
1. Disconnect the negative battery cable..
2. Remove the following parts:
a. Sunroof seaming welt (vehicles with sunroof)
b. Front scuff plate.
c. Rear scuff plate.
d. A-pillar trim.
...
Other materials:
Warning lights and indicators
The Subaru Solterra is equipped with a comprehensive set of warning
lights and indicators located on the instrument cluster and exterior mirrors, designed
to clearly communicate the current condition and operational status of various vehicle
systems to the driver in real time.
Warning lights ...
Headlight Leveling
The number of passengers and weight of
cargo in the luggage compartment change
the angle of the headlights.
Auto type
The angle of the headlights will be
automatically adjusted when turning on
the headlights.
The warning/indicator light turns on when
the system has a malfunction.
Refer ...
Fuel-Filler Lid and Cap
WARNING
When removing the fuel-fi ller cap,
loosen the cap slightly and wait for any
hissing to stop, then remove it:
Fuel spray is dangerous. Fuel can
burn skin and eyes and cause illness
if ingested. Fuel spray is released
when there is pressure in the fuel tank
and ...
