Mazda 3 Service Manual: Oil Seal (Differential) Replacement [G35 M R]
1. On level ground, jack up the vehicle and support it evenly on safety stands.
2. Remove the aerodynamic under cover No.2..
3. Drain the oil from the transaxle..
4. Remove the front splash shield..
5. Separate the drive shaft and joint shaft from the transaxle..
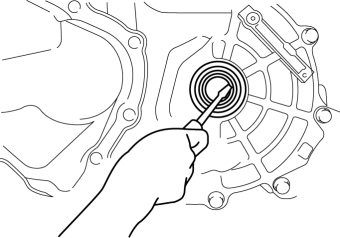
6. Remove the oil seals using a screwdriver.
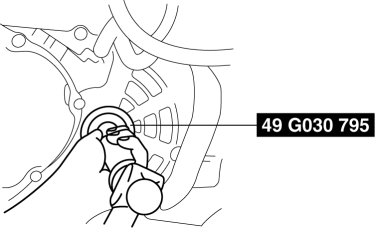
7. Using the SST
and a hammer, tap each new oil seal in evenly until the SST
contacts the transaxle case.
8. Coat the lip of each oil seal with transaxle oil.
9. Insert the drive shaft and joint shaft to the transaxle..
10. Install the front splash shield..
11. Add the specified amount and type of oil..
12. Install the aerodynamic under cover No.2..
 Oil Seal (Differential) Replacement [Fw6 A EL]
1. Remove the aerodynamic under cover No.2 and the splash shield as a single
unit..
2. Remove the oil seal.
a. Drain the ATF..
b. Disconnect the drive shaft (LH) from the transaxle..
c. Disc ...
 Oil Seal (Differential) Replacement [G66 M R]
1. On level ground, jack up the vehicle and support it evenly on safety stands.
2. Remove the aerodynamic under cover No.2..
3. Drain the oil from the transaxle..
4. Remove the front splash shi ...
Other materials:
Base Removal
1. Remove the rearview mirror..
2. Wind each end of a wire around a bar.
WARNING:
Using the piano wire with bare hands can cause injury. Always wear gloves
when using the piano wire.
NOTE:
Use a long sawing action to spread the work over the whole length of the
pi ...
Operating the Passenger Power Windows
To open the window to the desired
position, hold down the switch.
To close the window to the desired
position, pull up the switch.
NOTE
The power windows may be operated
when the power window lock switch
on the driver's door is in the unlocked
position.
The passenger windows ma ...
Antenna Feeder No.2 Removal/Installation
1. Disconnect the negative battery cable..
2. Remove the rain sensor cover. (Vehicles with auto light/wiper system).
3. Disconnect the rain sensor connector. (Vehicles with auto light/wiper system)
4. Partially peel back the seaming welts.
5. Remove the following parts:
a. Sunroof seaming ...
