Mazda 3 Service Manual: Sirius Satellite Radio Antenna Feeder Inspection
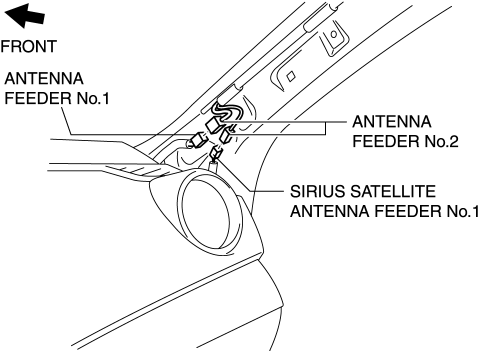
SIRIUS Satellite Radio Antenna Feeder No.1
NOTE:
-
SIRIUS satellite radio antenna feeder No.1 is integrated with the dashboard wiring harness.
1. Disconnect the negative battery cable..
2. Remove the following parts:
a. Passenger-side front scuff plate.
b. Passenger-side front side trim.
c. Dashboard under cover.
d. Grove compartment.
e. Passenger-side lower panel.
f. A-pillar trim (RH).
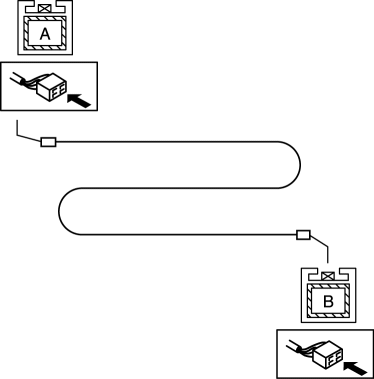
3. Disconnect the SIRIUS satellite radio antenna feeder connector..
4. Disconnect the antenna feeder No.2.
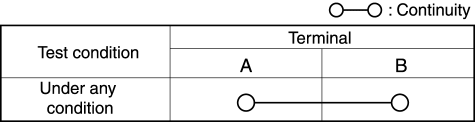
5. Verify that the continuity between SIRIUS satellite radio antenna feeder No.1 terminals is as indicated in the table.
-
If not as indicated in the table, replace dashboard wiring harness.
SIRIUS Satellite Radio Antenna Feeder No.2
NOTE:
-
SIRIUS satellite radio antenna feeder No.2 is integrated with the antenna feeder No.2.
1. Refer to ANTENNA FEEDER NO.2 INSPECTION.
SIRIUS Satellite Radio Antenna Feeder No.3
NOTE:
-
SIRIUS satellite radio antenna feeder No.3 is integrated with the antenna feeder No.3.
1. Refer to ANTENNA FEEDER NO.3 INSPECTION.
 Rear Speaker Removal/Installation
4SD
1. Disconnect the negative battery cable..
2. Remove the following parts:
a. Rear seat cushion.
b. Rear scuff plate.
c. Tire house trim.
d. C-pillar trim.
e. Rear package trim.
3. R ...
 Sirius Satellite Radio Antenna Feeder Removal/Installation
SIRIUS Satellite Radio Antenna Feeder No.1
NOTE:
SIRIUS satellite radio antenna feeder No.1 is integrated with the dashboard
wiring harness.
1. Refer to DASHBOARD DISASSEMBLY/ASSEMBL ...
Other materials:
Air Bag/Front Seat Belt
Pretensioner System Warning
Beep
If there is a problem with the air bag/seat
belt pretensioner systems and the warning
light illumination, a warning beep sound
will be heard for about 5 seconds every
minute.
The air bag and seat belt pretensioner
system warning beep sound will continue
to be heard for approximately 35
min ...
Back door
In the Subaru Solterra, the back door can be conveniently locked,
unlocked, opened, and closed using several intuitive methods, ensuring both ease
of use and a high level of safety during everyday operation.
WARNING
Carefully follow all safety precautions when operating the Subaru Solterra
b ...
Check Valve Inspection [Skyactiv G 2.0]
Airflow Inspection
1. Remove the vacuum hose..
2. Blow air into the vacuum hose using your mouth from the vacuum pump side and
verify that the air flows to the intake manifold side, then blow air from the intake
manifold side and verify that the air does not flow to the vacuum pump side.
...
