Mazda 3 Service Manual: Automatic Transaxle Fluid (ATF) Replacement [FS5 A EL]
WARNING:
-
A hot transaxle and ATF can cause severe burns. Turn off the engine and wait until they are cool before changing the ATF.
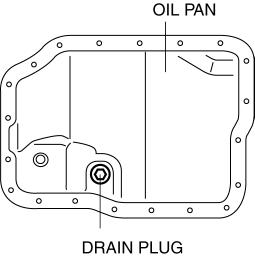
1. Drain the ATF.
a. Remove the oil dipstick.
b. Remove the aerodynamic under cover NO.2..
c. Remove the drain plug and washer to drain the ATF into a container.
2. Add the ATF.
a. Install a new washer and the drain plug.
-
Tightening torque
-
30—41 N·m {3.1—4.1 kgf·m, 23—30 ft·lbf}
b. Add the specified ATF through the oil filler tube.
-
ATF Type
-
Mazda Genuine ATF M-V
-
ATF Capacity (Reference)
-
Draining ATF from drain plug: 3.0 L {3.2 US qt, 2.6 lmp qt}
-
Overhauling transaxle: 5.0 L {5.3 US qt, 4.4 lmp qt}
3. Install the aerodynamic under cover NO.2..
4. Install the oil dipstick.
5. Inspect the ATF level..
 Automatic Transaxle Fluid (ATF) Inspection [Fw6 A EL]
CAUTION:
If the ATF level is not within the specification or ATF is not adhering to
the dipstick after warming up the engine, do not drive the vehicle. Otherwise,
the transaxle could be ...
 Automatic Transaxle Fluid (ATF) Replacement [Fw6 A EL]
WARNING:
Do not perform the servicing while the ATF is hot. Otherwise, it could cause
severe burns or serious injury.
1. Remove aerodynamic undercover No.2..
2. Remove the dipstick ...
Other materials:
Schedule 2
Chart symbols:
I: Inspect: Inspect and clean, repair, adjust, fill up, or replace if
necessary.
R: Replace
L : Lubricate
C: Clean
T: Tighten
Remarks:
*1 Use of FL-22 is recommended when replacing engine coolant. Using engine
coolant other than FL-22 may
cause serious damage to the en ...
Spark Plug Removal/Installation [Mzr 2.3 Disi Turbo]
CAUTION:
If a spark plug that is not as specified is installed, engine performance
will be deteriorated. Install only the specified spark plug when replacing.
1. Remove the battery cover..
2. Disconnect the negative battery cable..
3. Remove the charge air cooler..
4. Remove t ...
Recommended Oil
U.S.A., Canada, and Puerto Rico
Use SAE 0W-20 engine oil.
Mazda Genuine Oil is used in your
Mazda vehicle. Mazda Genuine 0W-20
Oil is required to achieve optimum fuel
economy.
For maintenance service, Mazda
recommends Mazda Genuine Parts and
Castrol ® (U.S.A. only).
Only use SAE 0W ...
