Mazda 3 Service Manual: Front Fog Light Aiming
CAUTION:
-
If the front fog light aiming is adjusted with cargo in the vehicle, it may not adjust correctly. Adjust the front fog light aiming with the vehicle under the following conditions:
-
No occupants inside vehicle
-
Cargo other than spare tire, jack, and tools not loaded
-
Tire pressure is at specification.
-
Park the vehicle on level ground
Except Mazdaspeed3
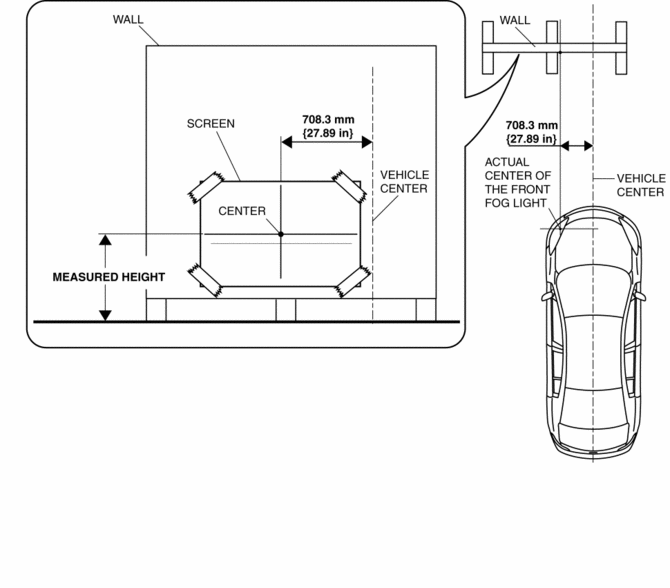
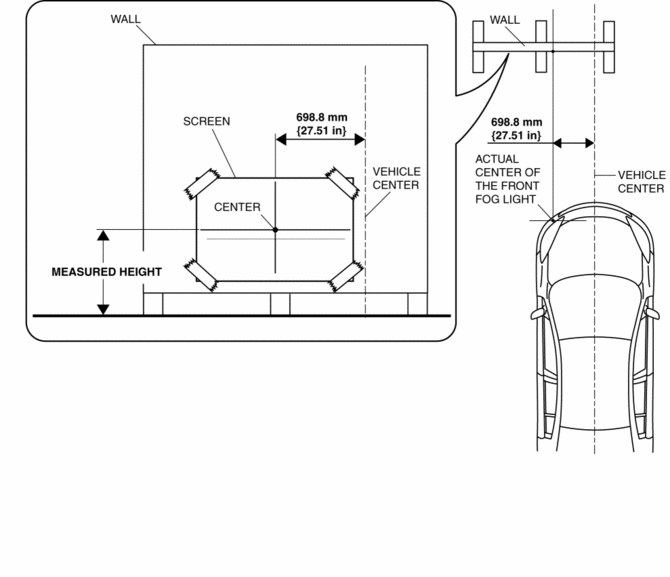
1. Make a screen as shown in the figure using double-weight, white paper.
2. Seat one person in the driver’s seat.
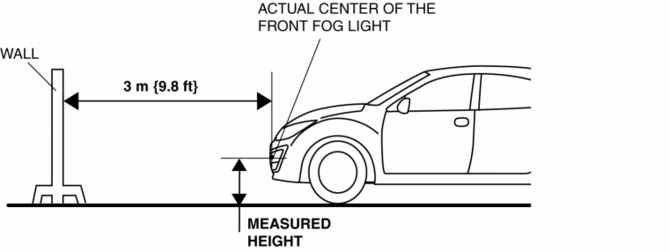
3. Line up the vehicle with the wall so that the center of the front fog light is 3 m {9.8 ft}
away from the wall.
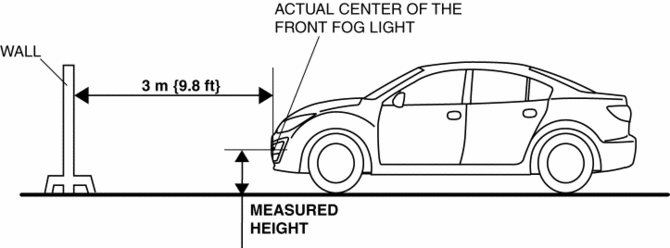
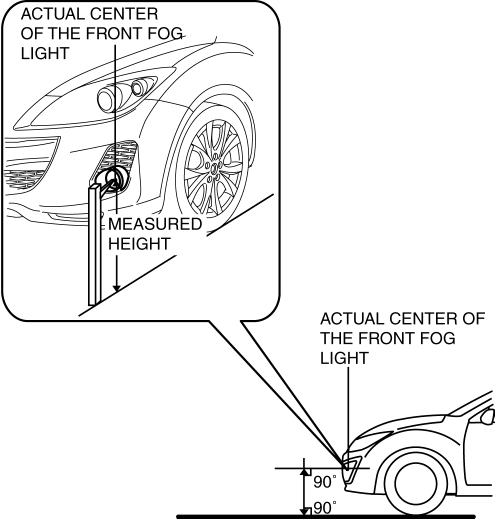
4. Measure the height at the center of the front fog light.
NOTE:
-
Since the height of the vehicle varies depending on the vehicle situation, measure the height of the center of the front fog light using the actual vehicle.
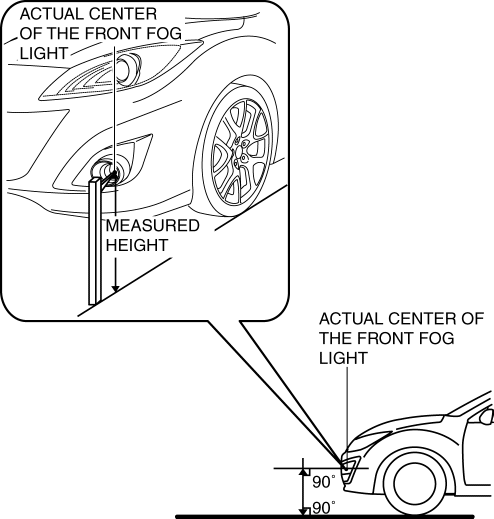
5. Align the center of the front fog light with the center of the screen.
6. Block the light of the other front fog light using a partition.
7. Start the engine.
NOTE:
-
If servicing is performed when the engine is stopped and the front fog light illuminates, it could result in a discharged battery. For the aiming adjustment, start the engine and perform servicing while the engine is idling.
8. Turn the front fog lights on.
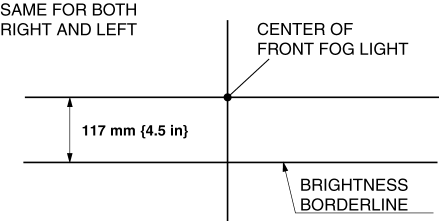
9. Verify that the brightness border line of the front fog light is at the position indicated on the adjustment screen.
-
If the brightness border line is not at the position indicated on the adjustment screen, perform the following adjustment.
-
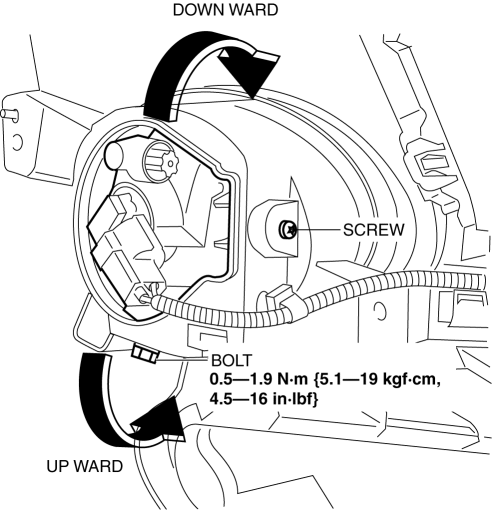
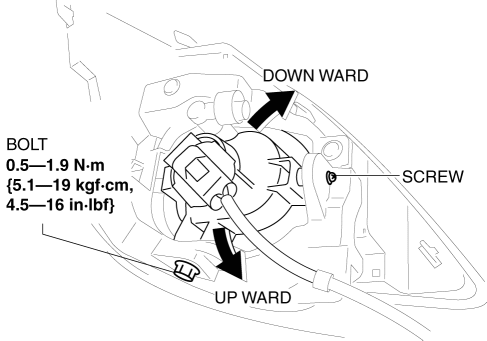
Loosen the bolt.
-
Loosen the screw.
-
Move the front fog light in the direction of the arrow shown in the figure to adjust the brightness border line to the position indicated on the adjustment screen.
-
Tighten the screw and bolt.
Mazdaspeed3
1. Make a screen as shown in the figure using double-weight, white paper.
2. Seat one person in the driver’s seat.
3. Line up the vehicle with the wall so that the center of the front fog light is 3 m {9.8 ft}
away from the wall.
4. Measure the height at the center of the front fog light.
NOTE:
-
Since the height of the vehicle varies depending on the vehicle situation, measure the height of the center of the front fog light using the actual vehicle.
5. Align the center of the front fog light with the center of the screen.
6. Block the light of the other front fog light using a partition.
7. Start the engine.
NOTE:
-
If servicing is performed when the engine is stopped and the front fog light illuminates, it could result in a discharged battery. For the aiming adjustment, start the engine and perform servicing while the engine is idling.
8. Turn the front fog lights on.
9. Verify that the brightness border line of the front fog light is at the position indicated on the adjustment screen.
-
If the brightness border line is not at the position indicated on the adjustment screen, perform the following adjustment.
-
Loosen the bolt.
-
Loosen the screw.
-
Move the front fog light in the direction of the arrow shown in the figure to adjust the brightness border line to the position indicated on the adjustment screen.
-
Tighten the screw and bolt.
 Front Combination Light Removal/Installation
WARNING:
Incorrect servicing of the discharge headlights could result in electrical
shock. Before servicing the discharge headlights, always refer to the discharge
headlight service warn ...
 Front Fog Light Bulb Removal/Installation
Except Mazdaspeed3
1. Disconnect the negative battery cable..
2. Slightly bend back the mudguard..
3. Disconnect the connector.
4. Rotate the front fog light bulb in the direction of the ar ...
Other materials:
Front Stabilizer Removal/Installation [Mzr 2.0, Skyactiv G 2.0, Mzr 2.5]
1. Remove the joint cover..
2. Disconnect the steering shaft from the steering gear and linkage..
3. Remove the front crossmember component..
4. Remove in the order indicated in the table.
5. Install in the reverse order of removal.
6. Inspect the wheel alignment and adjust it if necessary ...
Transaxle Oil Replacement [A26 M R]
1. Park the vehicle on level ground.
2. Remove the aerodynamic under cover No.2..
3. Remove the drain plug and gasket.
4. Drain the oil into a suitable container.
5. Install a new gasket and the drain plug.
Tightening torque
28—51 N·m {2.9—5.2 kgf·m, 21—37 ft·lbf}
...
Manifold Absolute Pressure (Map) Sensor/Boost Air Temperature Sensor Removal/Installation
[Mzr 2.3 Disi Turbo]
NOTE:
Because the boost air temperature sensor is integrated in the MAP sensor,
replacing the boost air temperature sensor includes replacement of the MAP sensor/boost
air temperature sensor.
1. Remove the battery cover..
2. Disconnect the negative battery cable..
3. Remove t ...
