Mazda 3 Service Manual: Front Combination Light Removal/Installation
WARNING:
-
Incorrect servicing of the discharge headlights could result in electrical shock. Before servicing the discharge headlights, always refer to the discharge headlight service warnings..
1. Disconnect the negative battery cable..
2. Remove the front bumper..
3. Disconnect the connector.
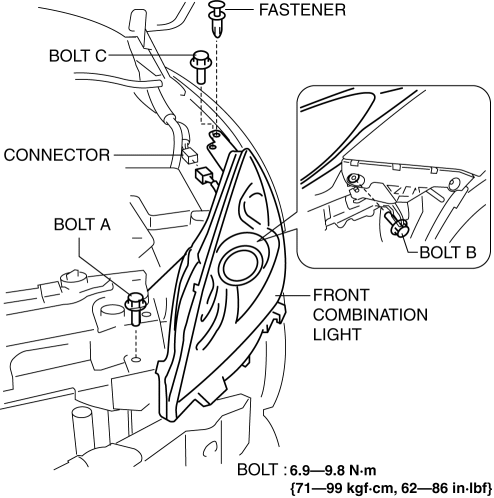
4. Remove the bolt A.
5. Remove the bolt B.
6. Remove the bolt C.
7. Remove the fastener.
8. Pull the front combination light in the direction of the arrow shown in the figure and remove the pin from the body.

9. Remove the front combination light.
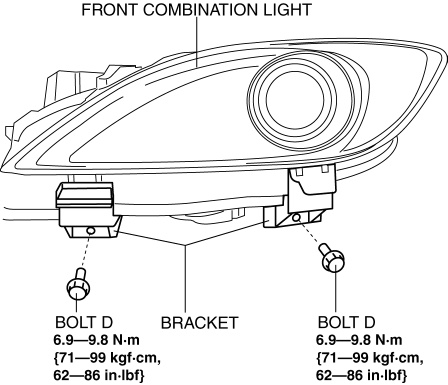
10. Remove the bolts D.
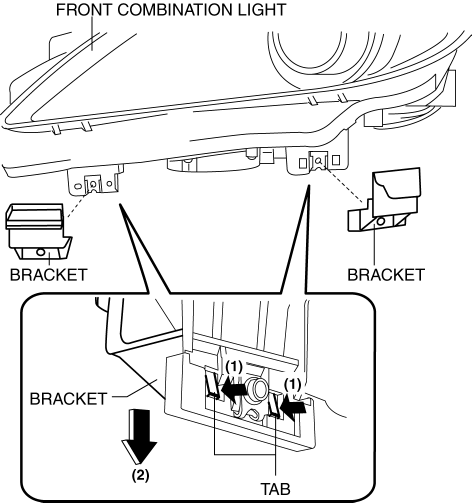
11. Remove the bracket in the direction of the arrow (2) shown in the figure while pressing the bracket tabs in the direction of the arrow (1).
12. Install in the reverse order of removal.
13. Adjust the headlight aiming..
 Front Combination Light Bracket Replacement
NOTE:
Verify that the front combination light is not damaged before using the repair
bracket for installation when the original brackets are damaged. If the front
combination light compo ...
 Front Fog Light Aiming
CAUTION:
If the front fog light aiming is adjusted with cargo in the vehicle, it may
not adjust correctly. Adjust the front fog light aiming with the vehicle under
the following conditio ...
Other materials:
Electric Power Steering Oil Pump Component Removal/Installation
CAUTION:
Be careful not to drop the electric power steering oil pump component as
the internal parts of the EHPAS CM could be damaged. Replace the electric power
steering oil pump component if it is subjected to an impact.
1. Remove the front mudguard (RH)..
2. Remove the aerod ...
Drive Belt Auto Tensioner Inspection [Mzr 2.0, Mzr 2.5]
MZR 2.0
1. Remove the generator drive belt with the A/C drive belt still installed and
set it out of the way..
2. Verify that the drive belt auto tensioner moves smoothly in the operational
direction.
If it does not move smoothly, replace the drive belt auto tensioner..
3. T ...
Clutch Cover Inspection [C66 M R]
1. Remove the clutch cover..
2. Perform the following procedures to inspect the clutch cover.
If it exceeds the maximum specification, replace the clutch cover..
a. Measure the wear of the diaphragm spring fingers.
Clutch cover diaphragm spring fingers maximum depth
0.6 ...
