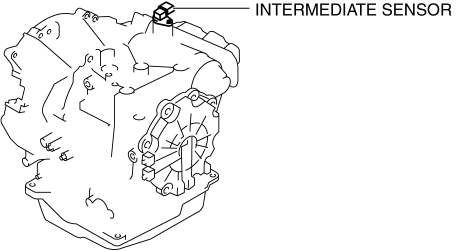
Mazda 3 Service Manual: Intermediate Sensor Inspection [FS5 A EL]
On-Vehicle Inspection
1. Inspect the power supply circuit for the intermediate sensor.
a. Set the battery component (ex: battery, battery tray and PCM component) out of the way.
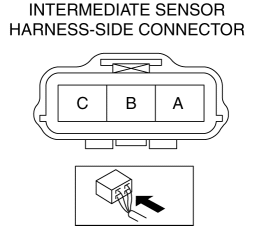
b. Disconnect the intermediate sensor connector.
c. Switch the ignition to ON (engine off).
d. Measure the voltage at intermediate sensor connector terminal A (harness-side).
-
If there is any malfunction, repair wiring harness between intermediate sensor and AT main relay.
-
Intermediate sensor specification
-
B+
e. Switch the ignition to off.
f. Connect the intermediate sensor connector.
2. Inspect the GND circuit for the intermediate sensor.
a. Switch the ignition to off.
b. Measure the voltage at intermediate sensor connector terminal C (harness-side).
-
If there is any malfunction, repair wiring harness between intermediate sensor and GND.
-
Intermediate sensor specification
-
Below 1.0 V
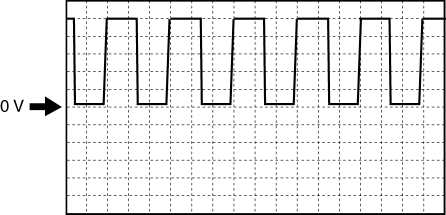
3. Inspect the signal circuit for the intermediate sensor.
a. Connect the oscilloscope to the following TCM connector terminals and set it as below.
-
(+) lead: TCM terminal AC
-
(-) lead: battery negative terminal
-
Oscilloscope setting: 1 V/DIV (Y), 200 μs/DIV (X), DC range
b. Start the engine.
c. Measure the wave form when the following conditions are met.
-
Gear position: 3GR
-
Vehicle speed: 30 km/h {19 mph}
-
If there is any malfunction, replace the intermediate sensor..
 Initial Learning [Fw6 A EL]
Introduction
If the control valve body and oil pressure switch are replaced, always perform
the initial learning. If the initial learning is not completed, engine rev-up
may occur or shif ...
 Intermediate Sensor Removal/Installation [FS5 A EL]
CAUTION:
If foreign materials are stuck to the sensor, disturbance by magnetic flux
can cause sensor output to be abnormal and thereby negatively affect control.
Make sure that foreign m ...
Other materials:
PCM Removal/Installation [Mzr 2.0, Mzr 2.5]
1. Remove the battery cover..
2. Disconnect the negative battery cable..
3. Remove the following items:.
Battery
PCM cover No.1
4. Disconnect the PCM connector..
5. Remove the battery tray and PCM component..
6. Remove in the order indicated in the table.
...
Fuel Gauge Sender Unit Removal/Installation
MZR 2.0, MZR 2.5
NOTE:
Fuel pump unit cannot be disassembled.
1. Remove the fuel gauge sender unit..
MZR 2.3 DISI Turbo
NOTE:
Fuel pump unit cannot be disassembled.
1. Remove the fuel gauge sender unit..
SKYACTIV-G 2.0
NOTE:
Fuel pump unit cannot be disasse ...
Operating Tips for CD Player
Condensation phenomenon
Immediately after turning on the heater
when the vehicle is cold, the CD or
optical components (prism and lens) in
the CD player may become clouded with
condensation. At this time, the CD will
eject immediately when placed in the unit.
A clouded CD can be corrected s ...
