Mazda 3 Service Manual: License Plate Light Removal/Installation
1. Disconnect the negative battery cable..
2. Remove the lens..
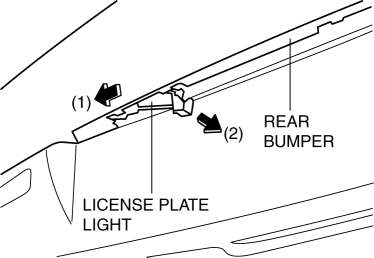
3. Insert a tape-wrapped fastener remover to the position shown in the figure, release the tabs.

4. Pull the rear bumper in the direction of the arrow (1) in the figure, and pull out the license plate lights in the direction of the arrow (2).
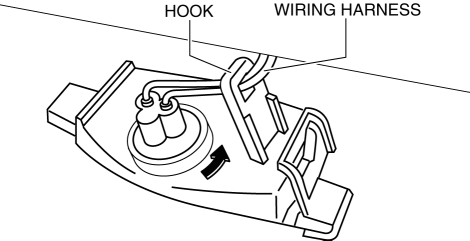
5. Pull out the wiring harness in the direction of the arrow and set it aside from the hook.
6. Remove the license plate light.
7. Install in the reverse order of removal.
 License Plate Light Bulb Removal/Installation
1. Disconnect the negative battery cable..
2. Insert a tape-wrapped fastener remover to the position shown in the figure,
release the tabs, and remove the lens.
3. Remove the license plate l ...
 PID/Data Monitor Inspection [Afs (Adaptive Front Lighting System)]
1. Connect the M-MDS (IDS) to the DLC-2.
2. After the vehicle is identified, select the following items from the initialization
screen of the IDS.
a. Select “DataLogger”.
b. Select “ ...
Other materials:
Illuminated Entry System
When the illuminated entry system
operates, the overhead light (switch is in
the DOOR position) turn on for:
About 30 seconds after the driver's door
is unlocked and the ignition is switched
off.
About 15 seconds after all doors are
closed and the ignition is switched off.
About 5 se ...
PID/Data Monitor Inspection [Blind Spot Monitoring (Bsm)]
1. Connect the M-MDS (IDS) to the DLC-2.
2. After the vehicle is identified, select the following items from the initialization
screen of the IDS.
a. Select “DataLogger”.
b. Select “Modules”.
c. Select “BSML” or “BSMR”.
3. Select the applicable PID from the PID table. ...
How to Use Aha
Aha is an application which can be used to enjoy various Internet content
such as Internet
radio and podcasts.
Stay connected to your friends activities by getting updates from Facebook and
Twitter.
Using the location-based service, nearby services and destinations can be
searched or re ...
