Mazda 3 Service Manual: Parameter Setting Procedure When Tire Size Is Changed
CAUTION:
-
If the wheel and tire sizes are changed, a discrepancy with the speedometer needle whereby it exceeds the allowable range could result in a malfunction. If the wheel and tire sizes are changed, perform the following procedure to change the tire size parameter setting.
-
The same parameters should be set in “Tire dimension”, “Tire Circumference”, and “Tire Size”.
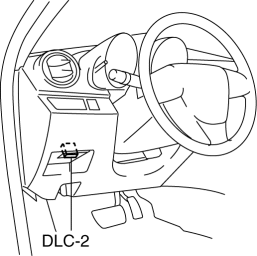
1. Connect the M-MDS to DLC-2.
2. After the vehicle is identified, select the following item from the initialization screen of the M-MDS.
-
Select “Module Programming”.
3. Select the items from the screen menu.
-
Select “Programmable Parameters”.
-
Select “Tire Size”.
4. Select an item name, and then select the option.
-
Select “Tire Size”.
-
Tire dimension (195/70R15, 205/50R17, 195/65R15, 205/55R16, 225/40R18)
-
Tire Circumference (195/70R15, 205/50R17, 195/65R15, 205/55R16, 225/40R18)
5. Select the items from the screen menu.
-
Select “Programmable Parameters”.
-
Select “Tire Size/Axle Ratio”.
6. Select an item name, and then select the option.
-
Select “Tire Size/Axle Ratio”.
-
Tire Size (195/70R15, 225/40R18, 195/65R15, 205/50R17, 205/55R16)
 Malfunctioning Wheel Unit Identification
NOTE:
The tire pressure monitoring system (TPMS) does not identify the location
of the malfunctioning wheel unit on the vehicle (RF, LF, LR, RR). The TPMS identifies
each wheel unit as N ...
 Tire House Trim Removal/Installation
4SD
1. Remove the rear seat cushion..
2. Remove the rear scuff plate..
3. Partially peel back the seaming welt.
4. Remove the fastener.
5. Pull the tire house trim in the direction of arrow s ...
Other materials:
Oil Seal (Differential) Replacement [C66 M R]
1. Remove the aerodynamic under cover No.2 and the splash shield as a single
unit..
2. Drain the manual transaxle oil..
3. Disconnect the drive shaft (LH) from the MTX..
4. Disconnect the drive shaft (RH) from the joint shaft..
5. Remove the joint shaft..
6. Remove the oil seal (LH).
...
Center Roof Antenna Inspection
4SD
1. Disconnect the negative battery cable..
2. Remove the rain sensor cover. (Vehicles with auto light/wiper system).
3. Disconnect the rain sensor connector. (Vehicles with auto light/wiper system)
4. Partially peel back the seaming welts.
5. Remove the following parts:
a. Sunroof se ...
Battery Recharging [Mzr 2.3 Disi Turbo]
Using GR8-1291:
(See GR8-1291 INSTANT TRAINING MODULE (VIDEO) .)
WARNING:
Keep all flames away from the battery, otherwise evaporated gas from the
battery fluid may catch fire and cause serious injury.
1. Remove the battery filler caps and check the water level. If necessary, add ...
