Mazda 3 Service Manual: Rear Center Seat Belt Removal/Installation
CAUTION:
-
The ELR (emergency locking retractor) has a spring that will unwind if the retractor cover is removed. The spring cannot be rewound by hand. If this occurs, the ELR will not work properly. Therefore, do not disassemble the retractor.
4SD
1. Remove the following parts:
a. Rear scuff plate.
b. Rear seat cushion.
c. Rear seat back.
d. Tire house trim.
e. C-pillar trim..
f. Rear package trim.
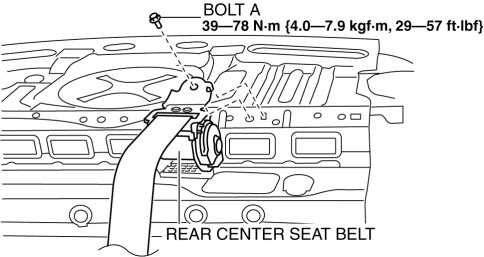
2. Remove the bolt A.
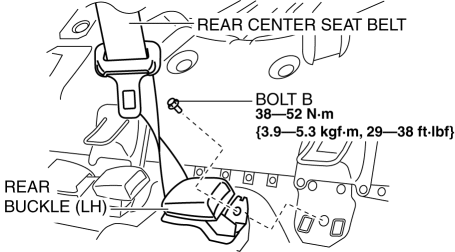
3. Remove the bolt B.
4. Remove the rear center seat belt.
5. Install in the reverse order of removal..
5HB
1. Remove the following parts:
a. Rear scuff plate.
b. Rear seat cushion.
2. Remove the bolt.

3. Remove the rear center seat belt with the rear seat back..
4. Install in the reverse order of removal..
Rear Center Seat Belt Installation Note
-
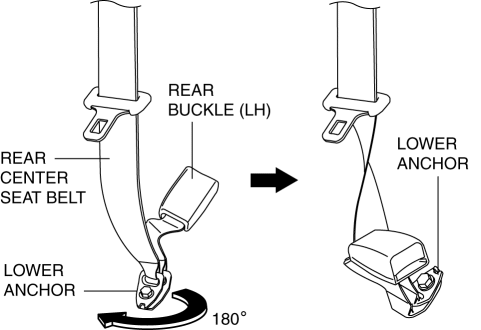
Rotate the rear center seat belt lower anchor clockwise 180° and install it.
 Front Tilt Motor Inspection
1. Remove the battery cover..
2. Disconnect the negative battery cable and wait 1 min or more..
3. Disconnect the front tilt motor connector.
4. Apply battery positive voltage to the front tilt ...
 Rear Seat Back Frame Removal/Installation
1. Remove the rear seat cushion..
2. Remove the rear buckle installation bolt..
3. Remove the rear seat back..
4. Remove the headrest.
5. Open the fasteners.
6. Detach the hooks.
7. ...
Other materials:
Sirius Satellite Radio Unit Removal/Installation
1. Disconnect the negative battery cable..
2. Remove the following parts:
a. Passenger-side front scuff plate.
b. Passenger-side front side trim.
c. Dashboard under cover.
d. Grove compartment.
e. Passenger-side lower panel.
3. Remove in the order indicated in the table.
...
High Mount Brake Light Bulb Removal/Installation
4SD
1. Disconnect the negative battery cable..
2. Remove the trunk lid trim..
3. Remove in the order indicated in the table.
1
Connector
2
Socket
3
High-mount brake light bulb
4. Install in the rev ...
Cargo Compartment Light Removal/Installation
1. Disconnect the negative battery cable..
2. Insert a tape-wrapped fastener remover into the service hole and pry with
the screwdriver in the direction shown by the arrow to remove the cargo compartment
light.
3. Disconnect the connector.
4. Remove the cargo compartment light.
5 ...
