Mazda 3 Service Manual: Starter Interlock Switch Inspection [Mzr 2.3 Disi Turbo]
CAUTION:
-
Do not reuse the starter interlock switch if it is removed from the vehicle even once. Replace with a new starter interlock switch when installing.
1. Remove the battery cover..
2. Disconnect the negative battery cable..
3. Disconnect the starter interlock switch connector.
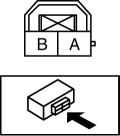
4. Verify that the continuity is as indicated in the table using a tester.

-
If the continuity is not as indicated in the table, replace the starter interlock switch.
.
 Starter Interlock Switch Inspection [Mzr 2.0, Mzr 2.5]
CAUTION:
Do not reuse the starter interlock switch if it is removed from the vehicle
even once. Replace with a new starter interlock switch when installing.
1. Remove the battery cove ...
 Starter Interlock Switch Inspection [Skyactiv G 2.0]
CAUTION:
Do not reuse the starter interlock switch if it is removed from the vehicle
even once. Replace with a new starter interlock switch when installing.
1. Remove the battery cove ...
Other materials:
Quarter Window Glass Removal
1. Remove the following parts:
a. Rear seat cushion.
b. Rear scuff plate.
c. Tire house trim.
d. Trunk side upper trim.
e. C-pillar trim.
2. Apply protective tape along the edge of the body and the quarter window glass.
NOTE:
For the areas of the sealant that are difficult ...
Blind Spot Monitoring (Bsm) Control Module Inspection
1. Disconnect the negative battery cable.
2. Remove the rear combination light..
3. Remove the rear bumper..
4. Connect the negative battery cable..
5. Measure the voltage at each terminal is as indicated in the Terminal Voltage
Tables.
If the voltage or continuity is not as specif ...
Manual Transaxle Shift Mechanism Removal/Installation [G35 M R]
1. Remove the battery cover..
2. Disconnect the negative battery cable.
3. Remove the battery component. (ex: battery, battery tray and PCM component).
4. Remove the air cleaner component..
5. Remove the aerodynamic under cover NO.2..
6. Remove the tunnel member (rear)..
7. Remove the u ...
