Mazda 3 Service Manual: Transaxle Oil Inspection [A26 M R]
1. Park the vehicle on level ground.
2. Remove the aerodynamic under cover No.2..
3. Remove the oil level plug and gasket.
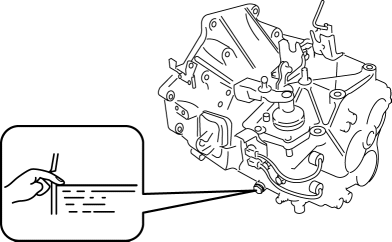
4. Verify that the oil is near the brim of the plug port.
-
If the oil level is lower than the low level, add the specified amount and type of oil through the oil level plug hole.
|
Item |
Specification |
|
Grade |
API service GL-4 |
|
Viscosity |
SAE 75W-80 |
5. Install a new gasket and the oil level plug.
-
Tightening torque
-
28—51 N·m {2.9—5.2 kgf·m, 21—37 ft·lbf}
6. Install the aerodynamic under cover No.2..
 Transaxle Fluid Temperature (Tft) Sensor Removal/Installation [FS5 A EL]
WARNING:
A hot transaxle and ATF can cause severe burns. Turn off the engine and wait
until they are cool.
1. Remove the primary control valve body.
a. Remove the battery cover..
...
 Transaxle Oil Inspection [G35 M R]
1. Park the vehicle on level ground.
2. Remove the aerodynamic under cover No.2..
3. Remove the oil level plug and washer.
4. Verify that the oil is near the brim of the plug port.
I ...
Other materials:
Message Indicated on Display*
If a message is displayed in the center display (type B audio), take
appropriate action (in a
calm manner) according to the displayed message.
Stop Vehicle in Safe Place Immediately
If the following messages are displayed in the center display (type B audio),
a vehicle
system may be malf ...
Outside Mirrors
WARNING
Be sure to look over your shoulder
before changing lanes:
Changing lanes without taking
into account the actual distance of
the vehicle in the convex mirror is
dangerous. You could have a serious
accident. What you see in the convex
mirror is closer than it app ...
Lights-On Reminder
The lights-on reminder is operable when
the time setting *1 of the auto headlight off
function is off.
If lights are on and the ignition is switched
to ACC or the ignition is switched off, a
continuous beep sound will be heard when
the driver's door is opened.
*1 If the light switch is le ...
