Mazda 3 Service Manual: Transaxle Oil Inspection [G35 M R]
1. Park the vehicle on level ground.
2. Remove the aerodynamic under cover No.2..
3. Remove the oil level plug and washer.
4. Verify that the oil is near the brim of the plug port.
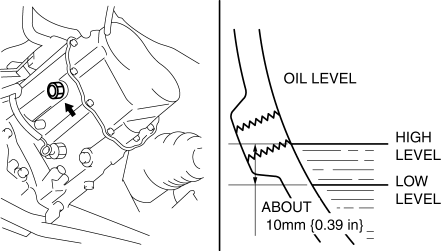
-
If the oil level is lower than the low level, add the specified amount and type of oil through the oil level plug hole.
|
Item |
Specification |
|
Grade |
API service GL-4 |
|
Viscosity |
SAE 75W-80 |
5. Install a new washer and the oil level plug.
-
Tightening torque
-
39—59 N·m {4.0—6.0 kgf·m, 29—43 ft·lbf}
6. Install the aerodynamic under cover No.2..
 Transaxle Oil Inspection [A26 M R]
1. Park the vehicle on level ground.
2. Remove the aerodynamic under cover No.2..
3. Remove the oil level plug and gasket.
4. Verify that the oil is near the brim of the plug port.
I ...
 Transaxle Oil Inspection [G66 M R]
1. Park the vehicle on level ground.
2. Remove the aerodynamic under cover No.2..
3. Remove the oil level plug and washer.
4. Verify that the oil is near the brim of the plug port.
I ...
Other materials:
PID/Data Monitor Inspection [Two Step Deployment Control System]
1. Connect the M-MDS (IDS) to the DLC-2.
2. After the vehicle is identified, select the following items from the initialization
screen of the IDS.
a. Select “DataLogger”.
b. Select “Modules”.
c. Select “RCM”.
3. Select the applicable PID from the PID table.
4. Verify th ...
Fuse Panel Description
Fuse block (Engine compartment)
*1 With xenon fusion headlights
*2 With halogen headlights
Fuse block (Left side)
...
Timing Chain Removal/Installation [Mzr 2.3 Disi Turbo]
WARNING:
Fuel vapor is hazardous. It can very easily ignite, causing serious injury
and damage. Always keep sparks and flames away from fuel.
Fuel line spills and leakage are dangerous. Fuel can ignite and cause serious
injuries or death and damage. Fuel can also irritate skin ...
