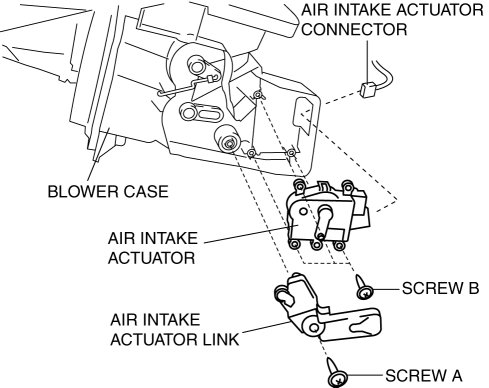
Mazda 3 Service Manual: Air Intake Actuator Removal/Installation [Full Auto Air Conditioner]
1. Set the air intake mode to FRESH.
2. Disconnect the negative battery cable..
3. Remove the following parts:
a. Front scuff plate (Passenger-side).
b. Front side trim (Passenger-side).
c. Dashboard under cover.
d. Glove compartment.
e. Lower panel (Passenger-side).
f. Shower duct (Passenger-side).
4. Disconnect the harness clip from the blower case.
5. Disconnect the air intake actuator connector.

6. Remove the blower case..
7. Remove the screw A.
8. Remove the air intake actuator link.
9. Remove the screw B.
10. Remove the air intake actuator.
11. Install in the reverse order of removal.
 Air Intake Actuator Inspection [Manual Air Conditioner]
1. Connect battery positive voltage to air intake actuator terminal B (or C),
connect terminal C (or B) to ground, and then verify that the air intake actuator
operates as shown in the table.
...
 Air Intake Actuator Removal/Installation [Manual Air Conditioner]
1. Set the air intake mode to FRESH.
2. Disconnect the negative battery cable..
3. Remove the following parts:
a. Front scuff plate (Passenger-side).
b. Front side trim (Passenger-side).
c. ...
Other materials:
Electric Variable Valve Timing Actuator, Hydraulic Variable Valve Timing Actuator
Removal/Installation [Skyactiv G 2.0]
WARNING:
A hot engine can cause severe burns. Turn off the engine and wait until it
is cool before servicing.
CAUTION:
Do not disassemble the electric variable valve timing actuator and hydraulic
variable valve timing actuator because they are precision units.
If ...
Audio Unit Disassembly/Assembly
CAUTION:
When disassembling the audio unit, it could get scratched if it is placed
directly on the ground. When disassembling the audio unit, spread a soft cloth
underneath to perform the work.
1. Disassemble in the order indicated in the table.
2. Assemble in the reverse order ...
Starter Interlock Switch Inspection [Mzr 2.3 Disi Turbo]
CAUTION:
Do not reuse the starter interlock switch if it is removed from the vehicle
even once. Replace with a new starter interlock switch when installing.
1. Remove the battery cover..
2. Disconnect the negative battery cable..
3. Disconnect the starter interlock switch connec ...
