Mazda 3 Service Manual: Air Mix Actuator Inspection [Full Auto Air Conditioner]
CAUTION:
-
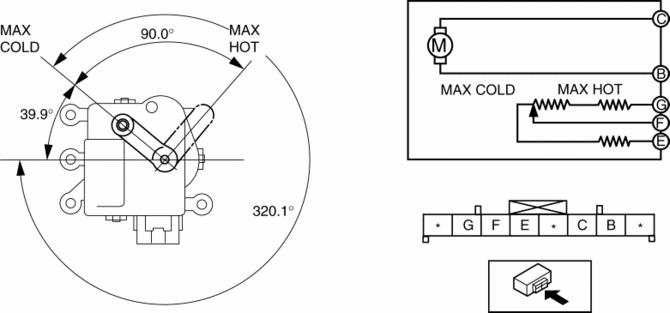
If the lever position exceeds the operation range shown in the figure, the circuit in the actuator could be damaged. Always perform an actuator operation inspection with the lever movement within the range shown in the figure.
Driver-side
1. Connect battery positive voltage to air mix actuator terminal C (or B), connect terminal B (or C) to ground, and then verify that the air mix actuator operates as shown in the table.
-
If the operation condition is not normal, replace the air mix actuator.
|
Terminal |
Air mix actuator operation |
|
|
B |
C |
|
|
B+ |
Ground |
COLD → HOT |
|
Ground |
B+ |
HOT → COLD |
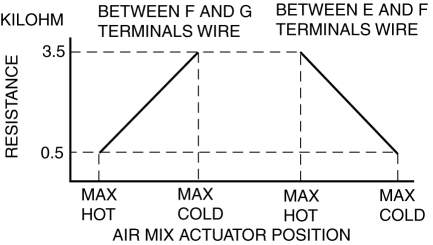
2. Verify that the resistance between terminals F and G, E and F matches the air mix actuator operation as shown in the graph.
-
If the operation condition and resistance are not normal, replace the air mix actuator.
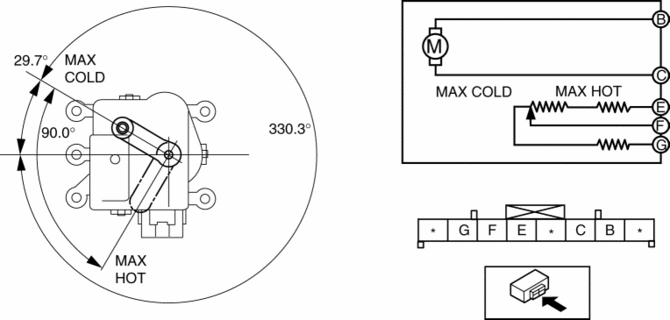
Passenger-side
1. Connect battery positive voltage to air mix actuator terminal C (or B), connect terminal B (or C) to ground, and then verify that the air mix actuator operates as shown in the table.
-
If the operation condition is not normal, replace the air mix actuator.
|
Terminal |
Air mix actuator operation |
|
|
B |
C |
|
|
B+ |
Ground |
HOT → COLD |
|
Ground |
B+ |
COLD → HOT |
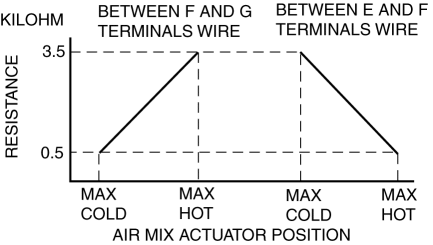
2. Verify that the resistance between terminals F and G, E and F matches the air mix actuator operation as shown in the graph.
-
If the operation condition and resistance are not normal, replace the air mix actuator.
 Air Intake Actuator Removal/Installation [Manual Air Conditioner]
1. Set the air intake mode to FRESH.
2. Disconnect the negative battery cable..
3. Remove the following parts:
a. Front scuff plate (Passenger-side).
b. Front side trim (Passenger-side).
c. ...
 Air Mix Actuator Removal/Installation [Full Auto Air Conditioner]
Driver-side
1. Disconnect the negative battery cable..
2. Disconnect the connector.
3. Remove the hook (1), remove the rod (2) from the air mix actuator link.
4. Remove the screw.
5. ...
Other materials:
Airflow Mode Actuator Inspection [Full Auto Air Conditioner]
CAUTION:
If the lever position exceeds the operation range shown in the figure, the
circuit in the actuator could be damaged. Always perform an actuator operation
inspection with the lever movement within the range shown in the figure.
1. Connect battery positive voltage to airfl ...
Jacking Positions, Vehicle Lift (2 Supports) And Safety Stand (Rigid Rack) Positions
Jacking Positions
WARNING:
Improperly jacking a vehicle is dangerous. The vehicle can slip off the jack
and cause serious injury. Use only the correct front and rear jacking points
and block the wheels.
Use safety stands to support the vehicle after it has been lifted.
...
Restraints SST [Standard Deployment Control System]
49 H066 002
Deployment tool
49 D066 002
Adapter harness
49 L066 002
Adapter harness
49 B066 004
Adapter harness
49 N088 0A0
Fuel and Therm ...
