Mazda 3 Service Manual: Air Mix Actuator Removal/Installation [Full Auto Air Conditioner]
Driver-side
1. Disconnect the negative battery cable..
2. Disconnect the connector.
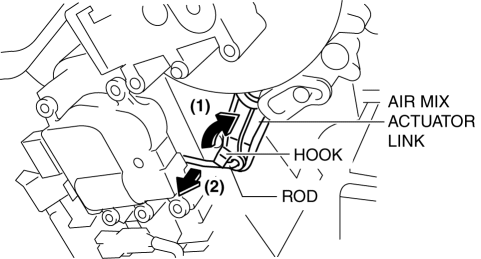
3. Remove the hook (1), remove the rod (2) from the air mix actuator link.
4. Remove the screw.
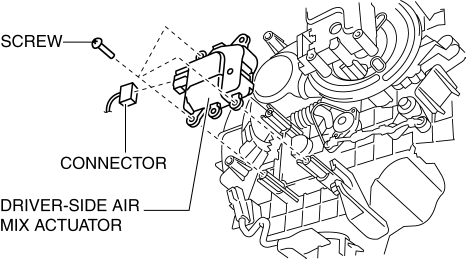
5. Remove the driver-side air mix actuator.
6. Install in the reverse order of removal.
Passenger-side
1. Disconnect the negative battery cable..
2. Remove the following parts:
a. Front scuff plate (Passenger-side).
b. Front side trim (Passenger-side).
c. Dashboard under cover.
d. Glove compartment.
e. Lower panel (Passenger side).
f. Shower duct (Passenger side).
3. Disconnect the connector.
4. Remove the screw.
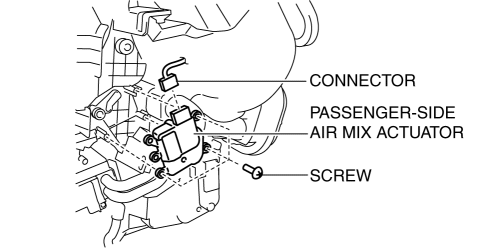
5. Remove the passenger-side air mix actuator.
6. Install in the reverse order of removal.
 Air Mix Actuator Inspection [Full Auto Air Conditioner]
CAUTION:
If the lever position exceeds the operation range shown in the figure, the
circuit in the actuator could be damaged. Always perform an actuator operation
inspection with the lev ...
 Airflow Mode Actuator Inspection [Full Auto Air Conditioner]
CAUTION:
If the lever position exceeds the operation range shown in the figure, the
circuit in the actuator could be damaged. Always perform an actuator operation
inspection with the lev ...
Other materials:
Bright-Metal Maintenance
Use tar remover to remove road tar and
insects. Never do this with a knife or
similar tool.
To prevent corrosion on brightmetal
surfaces, apply wax or chrome
preservative and rub it to a high luster.
During cold weather or in coastal areas,
cover bright-metal parts with a coating
...
Oil Control Valve (OCV) Removal/Installation [Mzr 2.0, Mzr 2.5]
1. Remove the battery cover..
2. Disconnect the negative battery cable..
3. Remove the plug hole plate..
4. Disconnect the wiring harness.
5. Remove the ignition coils..
6. Remove the ventilation hose.
7. Remove the oil level gauge.
8. Remove the cylinder head cover..
9. Remove in th ...
Roof Carrier Bracket Removal/Installation
4SD
1. Disconnect the negative battery cable..
2. Remove the following parts:
a. Sunroof seaming welt (vehicles with sunroof)
b. Front scuff plate.
c. Rear scuff plate.
d. A-pillar trim.
e. B-pillar lower trim.
f. Upper anchor of the front seat belt installation bolt.
g. B-pillar up ...
