Mazda 3 Service Manual: Automatic Transaxle Fluid (ATF) Replacement [FS5 A EL]
WARNING:
-
A hot transaxle and ATF can cause severe burns. Turn off the engine and wait until they are cool before changing the ATF.
1. Drain the ATF.
a. Remove the oil dipstick.
b. Remove the aerodynamic under cover NO.2..
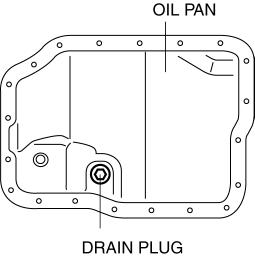
c. Remove the drain plug and washer to drain the ATF into a container.
2. Add the ATF.
a. Install a new washer and the drain plug.
-
Tightening torque
-
30—41 N·m {3.1—4.1 kgf·m, 23—30 ft·lbf}
b. Add the specified ATF through the oil filler tube.
-
ATF Type
-
Mazda Genuine ATF M-V
-
ATF Capacity (Reference)
-
Draining ATF from drain plug: 3.0 L {3.2 US qt, 2.6 lmp qt}
-
Overhauling transaxle: 5.0 L {5.3 US qt, 4.4 lmp qt}
3. Install the aerodynamic under cover NO.2..
4. Install the oil dipstick.
5. Inspect the ATF level..
 Automatic Transaxle Fluid (ATF) Inspection [Fw6 A EL]
CAUTION:
If the ATF level is not within the specification or ATF is not adhering to
the dipstick after warming up the engine, do not drive the vehicle. Otherwise,
the transaxle could be ...
 Automatic Transaxle Fluid (ATF) Replacement [Fw6 A EL]
WARNING:
Do not perform the servicing while the ATF is hot. Otherwise, it could cause
severe burns or serious injury.
1. Remove aerodynamic undercover No.2..
2. Remove the dipstick ...
Other materials:
Steering Switch Inspection
Without Bluetooth System
WARNING:
Handling the air bag module improperly can accidentally deploy the air bag
module, which may seriously injure you. Read the air bag system service warnings
and cautions before handling the air bag module..
1. Disconnect the negative battery cabl ...
Power Window System Preliminary Inspection [Power Window System]
Manual Open/close Function Inspection
STEP
INSPECTION
ACTION
1
Switch the ignition to ON.
Operate the power window using the manual open/close function on
the power window main switch.
...
Fuel Economy Monitor
For vehicles with type B audio, the Control Status and Fuel Consumption are
switched and
displayed by operating each icon in the display.
In addition, after completing a trip, the total energy efficiency to date is
displayed in the
ending display when the ending display is turned on.
Se ...
