Mazda 3 Service Manual: Climate Control Unit Removal/Installation [Full Auto Air Conditioner]
1. Disconnect the negative battery cable..
2. Remove the following parts:
a. Upper panel.
b. Shift lever knob (MTX).
c. Selector lever knob (ATX).
d. Shift panel.
e. Side wall.
f. Console.
g. Center panel.
h. Audio unit.
3. Remove in the order indicated in the table.
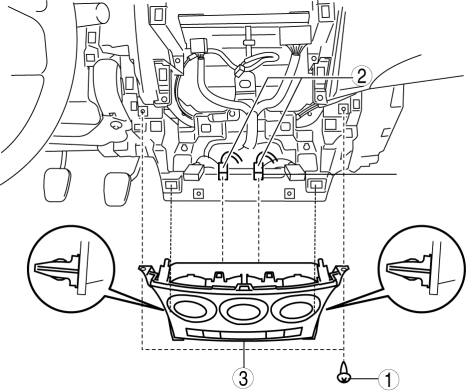
|
1 |
Screw |
|
2 |
Connector |
|
3 |
Climate control unit |
4. Install in the reverse order of removal.
 Climate Control Unit Inspection [Manual Air Conditioner]
1. Remove the climate control unit with the connector connected..
2. Switch the ignition to ON.
3. Connect the negative (-) lead of the tester to the body ground.
4. By inserting the positive (+ ...
 Climate Control Unit Removal/Installation [Manual Air Conditioner]
1. Disconnect the negative battery cable..
2. Remove the following parts:
a. Upper panel.
b. Shift lever knob (MTX).
c. Selector lever knob (ATX).
d. Shift panel.
e. Side wall.
f. Consol ...
Other materials:
Security Setting (Type A)
If a passcode is set, the system cannot be
activated unless the passcode is input.
NOTE
Do this function only when parked. It is
too distracting to attempt while driving
and you may make too many errors to be
effective.
Passcode setting
Press the pick-up button or talk button
with a sho ...
Non Return Valve Inspection [Mzr 2.0, Mzr 2.5]
WARNING:
Fuel is very flammable liquid. If fuel spills or leaks from the pressurized
fuel system, it will cause serious injury or death and facility breakage. Fuel
can also irritate skin and eyes. To prevent this, always complete the “Fuel
Line Safety Procedure”, while referring ...
Locking, Unlocking with Request
Switch (With the advanced keyless
function)
All doors and the liftgate can be locked/
unlocked by pressing the request switch
on the front doors while the key is being
carried.
(5–door)
The request switch on the liftgate can only
be used to lock all doors and the liftgate.
Front doors
Liftgate (5-door Lock only)
To lock
To ...
