Mazda 3 Service Manual: Clutch Release Cylinder Removal/Installation [C66 M R]
CAUTION:
-
Do not allow clutch fluid get on a painted surface. Clutch fluid contains properties which can dissolve the paint. If clutch fluid gets on a painted surface, wash it off with water immediately and wipe the area off completely.
1. Remove the aerodynamic under cover No.2..
2. Disconnect the clutch pipe and hose No.2 from clutch release cylinder, and plug it to avoid clutch fluid leakage..
3. Remove the clutch release cylinder.
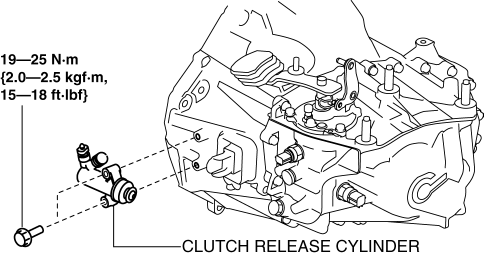
4. Install in the reverse order of removal.
5. Bleed the air from the clutch system..
 Clutch Release Collar Inspection [C66 M R]
CAUTION:
Do not clean the clutch release collar with cleaning fluids or a steam cleaner
because it is filled with grease.
Operation Inspection
1. Turn the collar while applying force ...
 Clutch Unit Removal/Installation [C66 M R]
1. Remove the battery cover..
2. Disconnect the negative battery cable..
3. Remove the aerodynamic under cover No.2 and the splash shield as a single
unit..
4. Drain the manual transaxle oil.. ...
Other materials:
Fuel Gauge Sender Unit Removal/Installation
MZR 2.0, MZR 2.5
NOTE:
Fuel pump unit cannot be disassembled.
1. Remove the fuel gauge sender unit..
MZR 2.3 DISI Turbo
NOTE:
Fuel pump unit cannot be disassembled.
1. Remove the fuel gauge sender unit..
SKYACTIV-G 2.0
NOTE:
Fuel pump unit cannot be disasse ...
No.28 Fuel Filling Shut Off Concerns [Mzr 2.0, Mzr 2.5]
28
FUEL FILLING SHUT OFF CONCERNS
DESCRIPTION
Fuel does not shut off properly.
POSSIBLE CAUSE
PCM DTC is stored
Nonreturn valve malfunction
Fuel nozzle ...
Mass Air Flow (MAF) Sensor Inspection [Mzr 2.0, Mzr 2.5]
Visual Inspection
1. Remove the battery cover..
2. Disconnect the negative battery cable..
3. Disconnect the MAF/IAT sensor connector.
4. Remove the MAF/IAT sensor..
5. Visually inspect the MAF/IAT sensor for the following:
Damage, cracks, soiling
Rusted sensor terminal
...
