Mazda 3 Service Manual: Discharge Headlight System Inspection
Discharge headlight inoperative
WARNING:
-
Incorrect servicing of the discharge headlight bulb could result in electrical shock. Before servicing the discharge headlight bulb, always refer to the service warnings..
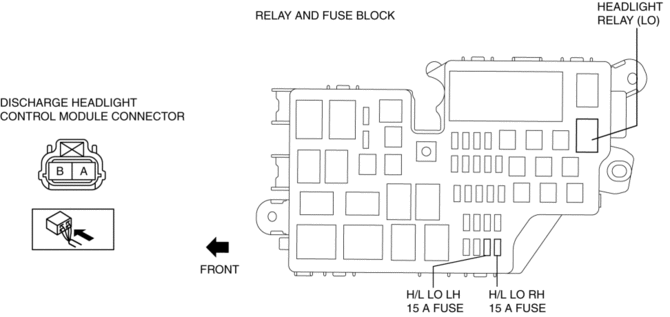
Terminal layout
Inspection procedure
|
STEP |
INSPECTION |
ACTION |
|
|
1 |
INSPECT
POWER SUPPLY CIRCUIT OF DISCHARGE HEADLIGHT CONTROL MODULE
|
Yes |
Go to Step 6. |
|
No |
Go to the next step. |
||
|
2 |
INSPECT
FUSE
|
Yes |
Go to the next step. |
|
No |
Replace the fuse. |
||
|
3 |
INSPECT
HEADLIGHT RELAY
|
Yes |
Go to the next step. |
|
No |
Replace the headlight relay (LO).. |
||
|
4 |
INSPECT
LIGHT SWITCH
|
Yes |
Go to the next step. |
|
No |
Replace the light switch.. |
||
|
5 |
INSPECT
FOR OPEN OR SHORT CIRCUITS IN THE FOLLOWING WIRING HARNESSES BETWEEN BATTERY
AND DISCHARGE HEADLIGHT CONTROL MODULE
|
Yes |
Go to the next step. |
|
No |
Replace the related wiring harness. |
||
|
6 |
INSPECT
FOR OPEN OR SHORT CIRCUITS IN THE FOLLOWING WIRING HARNESS BETWEEN DISCHARGE
HEADLIGHT CONTROL MODULE AND GROUND
|
Yes |
Go to the next step. |
|
No |
Replace the related wiring harness. |
||
|
7 |
VERIFY
WHETHER MALFUNCTION IS IN DISCHARGE HEADLIGHT BULB OR DISCHARGE HEADLIGHT
CONTROL MODULE
|
Yes |
Replace the discharge headlight bulb.. |
|
No |
Replace the discharge headlight control module.. |
||
 Discharge Headlight Service Warnings
Discharge Headlight Service Warnings
To prevent electrical shock when replacing the discharge headlight bulb,
always perform the servicing with dry hands and in an area where it does not
...
 Front Combination Light Bracket Replacement
NOTE:
Verify that the front combination light is not damaged before using the repair
bracket for installation when the original brackets are damaged. If the front
combination light compo ...
Other materials:
Driver Side Air Bag Module Removal/Installation [Standard Deployment Control
System]
WARNING:
Handling the air bag module improperly can accidentally deploy the air bag
module, which may seriously injure you. Read the air bag system service warnings
and cautions before handling the air bag module..
1. Switch the ignition to off.
2. Disconnect the negative batte ...
Rear Door Trim Disassembly/Assembly
1. Disassemble in the order shown in the figure.
1
Screw
2
Assist handle
3
Switch panel cover
4
Power window subswitch
5
Rear door trim
2. Assembl ...
Seat Warmer
The front seats are electrically heated. The
ignition must be switched ON.
Press the seat warmer switch to illuminate
the indicator light while the ignition
is switched ON. The mode changes as
follows each time the seat warmer switch
is pressed.
WARNING
Be careful when using t ...
