Mazda 3 Service Manual: Drive Belt Removal/Installation [Skyactiv G 2.0]
WARNING:
-
A hot engine can cause severe burns. Turn off the engine and wait until it is cool before servicing.
NOTE:
-
Remove/install the drive belt from the underside of the vehicle.
Generator Drive Belt Removal/Installation
CAUTION:
-
To prevent damage to the drive belt auto tensioner, do not apply excessive torque after the tensioner moves full-stroke.
1. Remove the aerodynamic under cover No.2 and splash shield as a single unit..
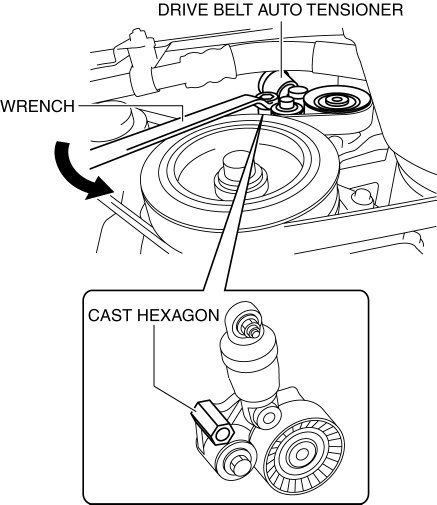
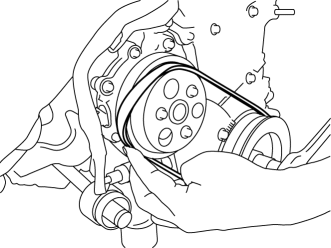
2. Insert a wrench onto the cast hexagon on the drive belt auto tensioner and release the tension by slowly turning in the direction shown in the figure.
3. Remove the generator drive belt.
4. Install the generator drive belt.
5. Rotate the crankshaft pulley clockwise approx. halfway and verify that the generator drive belt is installed correctly.
-
If the rib of the drive belt and the groove of each pulley are not aligned, remove the drive belt and re-install it.
6. Verify that the indicator part of the cast hexagon on the drive belt auto tensioner is within the normal range.(See DRIVE BELT INSPECTION [SKYACTIV-G 2.0].)
7. Install the aerodynamic under cover No.2 and splash shield as a single unit..
Water Pump Drive Belt
Removal
1. Remove the generator drive belt..
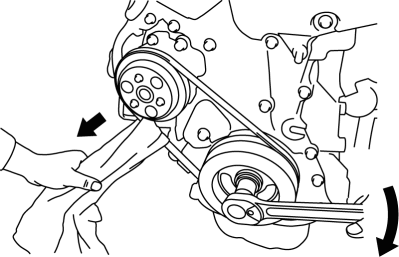
2. Apply a clean cloth to the water pump drive belt as shown in the figure.
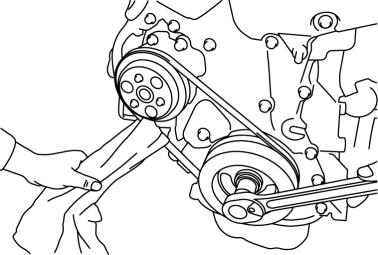
3. Pull the cloth in the direction of the arrow and rotate the crankshaft pulley clockwise.
CAUTION:
-
To prevent damaging the drive belt, do not stop rotating the crankshaft pulley while performing the removal procedure (with inserted cloth between drive belt and water pump pulley).
NOTE:
-
The rib of the drive belt can be slid from the groove of the water pump pulley by rotating the crankshaft pulley while pulling the cloth in the direction of the arrow.
4. Remove the water pump drive belt.
Installation
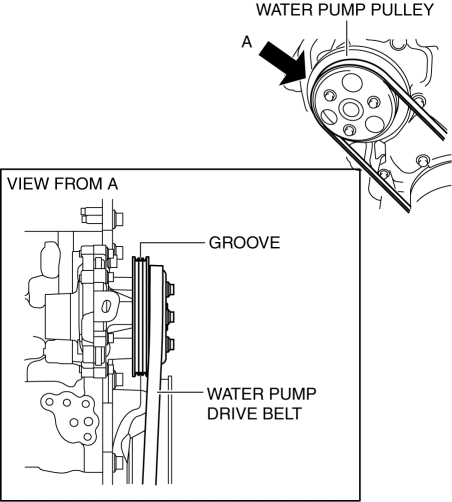
1. Set one side of the water pump drive belt into the groove of the crankshaft pulley.
2. Set the other side of the water pump drive belt into the groove of the water pump pulley with the smaller circumference.
CAUTION:
-
Be careful not to get a finger caught in between the drive belt and pulley when performing the following procedure.
-
Wearing gloves could result in fingers getting caught between the drive belt and pulley. Do not wear cotton gloves when performing the procedure.
3. Press the drive belt up from the smaller circumference pulley into the groove of the larger circumference pulley, and rotate the crankshaft pulley clockwise.
CAUTION:
-
To prevent damaging the drive belt, do not stop rotation of the crankshaft pulley while pressing the drive belt up from the height difference of the water pump pulley to the groove of the pulley.
4. After drive belt installation, rotate the crankshaft pulley clockwise approx. halfway and verify that the water pump drive belt is installed correctly.
-
If the rib of the drive belt and the groove of the pulley are not aligned, remove the drive belt and re-install it.
5. Install the generator drive belt..
 Drive Belt Removal/Installation [Mzr 2.3 Disi Turbo]
1. Remove the aerodynamic under cover No.2 and splash shield as a single unit..
2. Rotate the drive belt auto tensioner in the direction shown in the figure
and remove the drive belt.
3. In ...
 Evaporator Inspection
1. Inspect the evaporator for damage, cracks, and oil leakage.
If there is any malfunction, replace the evaporator.
2. Visually inspect the fins for bending.
If there is any bend ...
Other materials:
Rear Center Seat Belt Removal/Installation
CAUTION:
The ELR (emergency locking retractor) has a spring that will unwind if the
retractor cover is removed. The spring cannot be rewound by hand. If this occurs,
the ELR will not work properly. Therefore, do not disassemble the retractor.
4SD
1. Remove the following parts:
...
Key
WARNING
Do not leave the key in your vehicle with
children and keep them in a place where
your children will not fi nd or play with
them:
Leaving children in a vehicle with the
key is dangerous. This could result in
someone being badly injured or even
killed. Children ...
Transaxle Fluid Temperature (Tft) Sensor Removal/Installation [FS5 A EL]
WARNING:
A hot transaxle and ATF can cause severe burns. Turn off the engine and wait
until they are cool.
1. Remove the primary control valve body.
a. Remove the battery cover..
b. Disconnect the negative battery cable.
c. Remove the aerodynamic under cover NO.2..
d. Clean ...
