Mazda 3 Service Manual: Filament Inspection
1. Turn the ignition switch to the ON position.
2. Turn the rear window defroster switch on.
CAUTION:
-
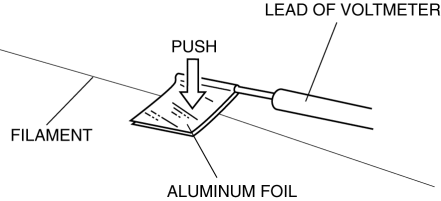
Directly touching the rear window defroster filament with the lead of the tester could damage it. Wrap aluminum foil around the end of the lead and inspect the filament by touching it with the foil.
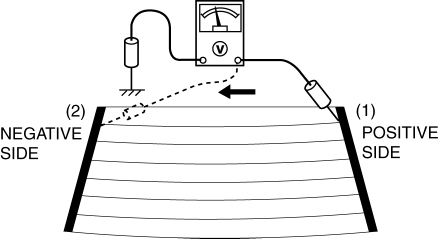
3. Connect the positive lead of the tester to the positive side of each filament and the negative lead to ground.
4. Gradually slide the positive lead from the positive side to the negative side and verify that the voltage decreases accordingly.
-
If the voltage changes rapidly, the filament has a malfunction. Repair the filament.
|
Measured part
|
Voltage (Reference)
|
|
(1) to (2) |
Approx. 11 V to 0 V |
 Base Removal
1. Remove the rearview mirror..
2. Wind each end of a wire around a bar.
WARNING:
Using the piano wire with bare hands can cause injury. Always wear gloves
when using the piano wire ...
 Filament Repair
1. Clean the filament using isopropyl alcohol.
2. Attach tape to both sides of the filament.
3. Using a small brush or marking pen, apply silver paint.
4. After 2—3 min, carefully remove t ...
Other materials:
Rear Door Speaker Inspection
1. Disconnect the negative battery cable..
2. Remove the rear door trim..
3. Remove the rear door speaker..
4. Verify the resistance between the rear door speaker terminals.
If not within the specification, replace the rear door speaker.
Resistance
Without Bose ...
Forced Ignition On [With Advanced Keyless Entry And Push Button Start System]
NOTE:
In order to perform a forced ignition ON, the M-MDS (IDS) is necessary. If
the servicing is being done outside of an Authorized Mazda dealership, contact
an Authorized Mazda dealership for instructions.
The forced ignition ON procedure forces a power supply to each part w ...
Transaxle Range (TR) Switch Inspection [FS5 A EL]
CAUTION:
Water or foreign objects entering the connector can cause a poor connection
or corrosion. Be sure not to drop water or foreign objects on the connector
when disconnecting it.
Operation Inspection
1. Perform the following procedures to inspect the TR switch.
If t ...
