Mazda 3 Service Manual: Front Fog Light Relay Removal/Installation
1. Disconnect the negative battery cable..
2. Remove the front mudguard.(RH).
3. Remove the front fog light relay case.
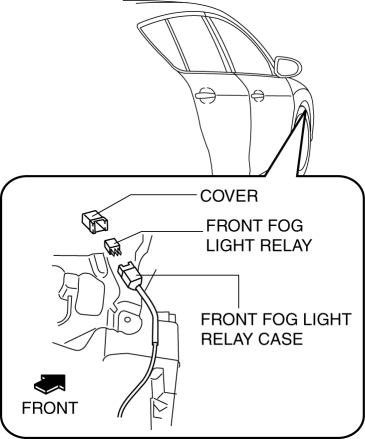
4. Remove the cover.
5. Remove the front fog light relay.
6. Install in the reverse order of removal..
Front Fog Light Relay Installation Note
1. Install the front fog light relay case to the shroud panel with the front fog light relay cover facing upward.
CAUTION:
-
If the front fog light relay case is installed to the shroud panel with the cover downward, water may penetrate the cover and the front fog light relay may not operate normally. Install the front fog light relay case with the cover facing upward.

 Front Fog Light Bulb Removal/Installation
Except Mazdaspeed3
1. Disconnect the negative battery cable..
2. Slightly bend back the mudguard..
3. Disconnect the connector.
4. Rotate the front fog light bulb in the direction of the ar ...
 Front Fog Light Removal/Installation
Except Mazdaspeed3
1. Disconnect the negative battery cable..
2. Remove the front bumper..
3. Pull the wiring harness from the hook in the direction of the arrow shown
in the figure and remove ...
Other materials:
Antenna Feeder No.7 Inspection
1. Disconnect the negative battery cable..
2. Remove the liftgate upper trim..
3. Disconnect the connector A and B..
4. Verify that the continuity between antenna feeder No.7 terminals is as indicated
in the table.
If not as indicated in the table, replace antenna feeder No.7.
...
Air Filter Inspection [Mzr 2.3 Disi Turbo]
Airflow Inspection
1. Remove the air filter..
2. Blow from port A and verify that there is airflow from port B.
If there is no airflow, replace the air filter..
3. Blow from port B and verify that there is airflow from port A.
If there is no airflow, replace the air filt ...
Vacuum Pump Removal/Installation [Skyactiv G 2.0]
1. Remove the plug hole plate..
2. Remove the battery and battery tray..
3. Pinch open the clamp using pliers and disconnect the vacuum hose from the
vacuum pump.
4. Remove in the order shown in the table.
5. Install in the reverse order of removal.
1
Vacu ...
