Mazda 3 Service Manual: Fuel Tank Removal/Installation [Mzr 2.0, Mzr 2.5]
WARNING:
-
Fuel is very flammable liquid. If fuel spills or leaks from the pressurized fuel system, it will cause serious injury or death and facility breakage. Fuel can also irritate skin and eyes. To prevent this, always complete the “Fuel Line Safety Procedure”, while referring to the “BEFORE SERVICE PRECAUTION”.
-
A person charged with static electricity could cause a fire or explosion, resulting in death or serious injury. Before draining fuel, make sure to discharge static electricity by touching the vehicle body.
CAUTION:
-
Disconnecting/connecting the quick release connector without cleaning it may cause damage to the fuel pipe and quick release connector. Always clean the quick release connector joint area before disconnecting/connecting using a cloth or soft brush, and make sure that it is free of foreign material.
1. Level the vehicle.
2. Complete the “BEFORE SERVICE PRECAUTION”..
3. Disconnect the quick release connector..
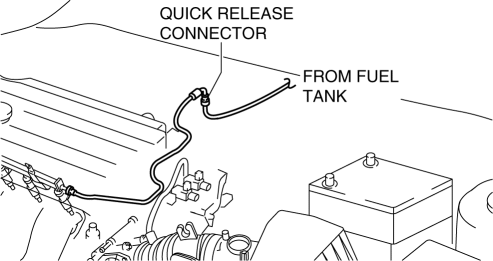
4. Connect a long hose to the disconnected quick release connector and drain the fuel into a container used for collecting gasoline.
5. Drain the fuel from the fuel tank using the following procedure:
-
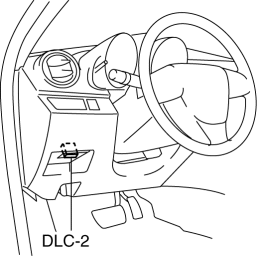
Using M-MDS
-
Connect the M-MDS to the DLC-2.
-
Using the simulation function “FP”, start the fuel pump..
-
Without using M-MDS
-
Remove the battery cover..
-
Disconnect the negative battery cable..
-
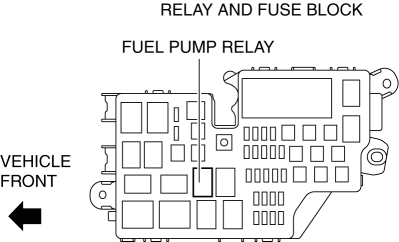
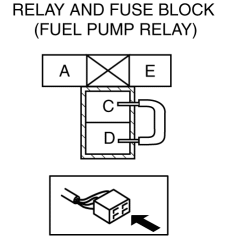
Remove the fuel pump relay.
CAUTION:
-
Short the specified terminals because shorting the wrong terminal of the relay and fuse block may cause malfunctions.
-
-
Using a jumper wire, short fuel pump relay terminals C and D in the relay and fuse block.
-
Connect the negative battery cable and operate the fuel pump..
CAUTION:
-
The fuel pump could be damaged if it is operated while there is no fuel in the fuel tank. Verify the amount of fuel being discharged from the hose and stop operation of the fuel pump when essentially no fuel is being discharged.
-
6. Stop the fuel pump using the following procedure.
-
Using M-MDS
-
Using the simulation function “FP”, stop the fuel pump..
-
Remove the battery cover..
-
Disconnect the negative battery cable..
-
Without using M-MDS
-
Disconnect the negative battery cable to stop the fuel pump..
7. To remove the fuel pump unit, remove the following parts:
a. Rear seat cushion.
b. Service hole cover
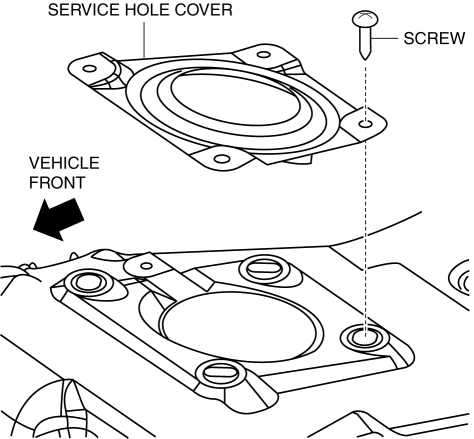
c. fuel pump unit connector
8. Remove the TWC..
9. Remove the under cover..
10. Remove the insulator (middle No.1)..
11. Remove in the order indicated in the table.
12. Install in the reverse order of removal.
13. Complete the “AFTER SERVICE PRECAUTION”..
Except for Mexico
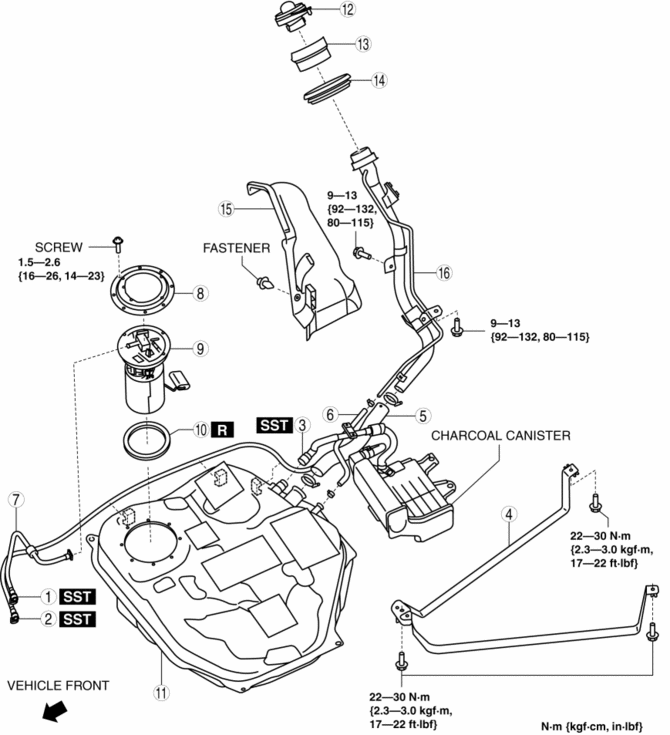
|
1 |
Quick release connector (See QUICK RELEASE CONNECTOR REMOVAL/INSTALLATION [MZR 2.0, MZR 2.5].) |
|
2 |
Quick release connector (See QUICK RELEASE CONNECTOR (EMISSION SYSTEM) REMOVAL/INSTALLATION [MZR 2.0, MZR 2.5].) |
|
3 |
Quick release connector (See QUICK RELEASE CONNECTOR (EMISSION SYSTEM) REMOVAL/INSTALLATION [MZR 2.0, MZR 2.5].) |
|
4 |
Fuel tank strap |
|
5 |
Joint hose (See Joint Hose Installation Note.) |
|
6 |
Breather hose (See Breather Hose Removal Note.) (See Breather Hose Installation Note.) |
|
7 |
Fuel hose (See QUICK RELEASE CONNECTOR REMOVAL/INSTALLATION [MZR 2.0, MZR 2.5].) |
|
8 |
Set plate |
|
9 |
Fuel pump unit |
|
10 |
O-ring |
|
11 |
Fuel tank |
|
12 |
Fuel-filler cap |
|
13 |
Protector |
|
14 |
Dust cover |
|
15 |
Fuel-filler pipe protector |
|
16 |
Fuel-filler pipe (See Fuel-Filler Pipe Removal Note.) |
Mexico
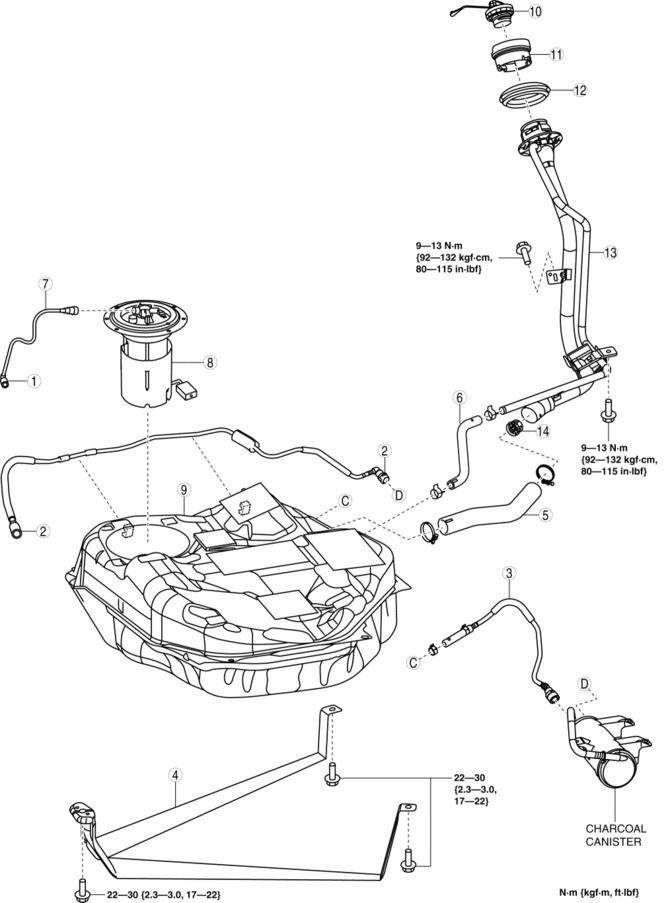
|
1 |
Quick release connector (See QUICK RELEASE CONNECTOR REMOVAL/INSTALLATION [MZR 2.0, MZR 2.5].) |
|
2 |
Quick release connector (See QUICK RELEASE CONNECTOR (EMISSION SYSTEM) REMOVAL/INSTALLATION [MZR 2.0, MZR 2.5].) |
|
3 |
Evaporative hose (See QUICK RELEASE CONNECTOR (EMISSION SYSTEM) REMOVAL/INSTALLATION [MZR 2.0, MZR 2.5].) |
|
4 |
Fuel tank strap |
|
5 |
Joint hose (See Joint Hose Installation Note.) |
|
6 |
Breather hose (See Breather Hose Removal Note.) (See Breather Hose Installation Note.) |
|
7 |
Fuel hose (See QUICK RELEASE CONNECTOR REMOVAL/INSTALLATION [MZR 2.0, MZR 2.5].) |
|
8 |
Fuel pump unit |
|
9 |
Fuel tank |
|
10 |
Fuel-filler cap |
|
11 |
Protector |
|
12 |
Dust cover |
|
13 |
Fuel-filler pipe (See Fuel-Filler Pipe Removal Note.) |
|
14 |
Non-return valve |
Breather Hose Removal Note
1. Disconnect the breather hose of fuel-filler pipe side.
2. Remove the following parts as a single unit.
-
Fuel tank
-
Breather hose
-
Fuel pump unit
-
Fuel hose
3. Remove the breather hose.
Fuel-Filler Pipe Removal Note
Except for Mexico
1. Remove the rear tire (RH)..
2. Remove the fuel-filler pipe.
Mexico
1. Remove the rear tire (RH)..
2. Remove the following parts:
a. Rear auto leveling sensor (Vehicle with AFS).
b. Rear stabilizer.
c. Rear coil spring.
d. Rear lower arm.
e. Rear crossmember.
3. Remove the fuel-filler pipe.
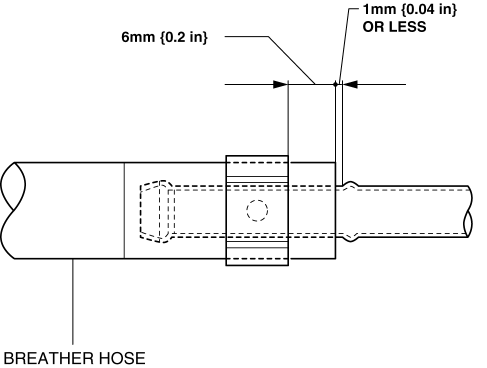
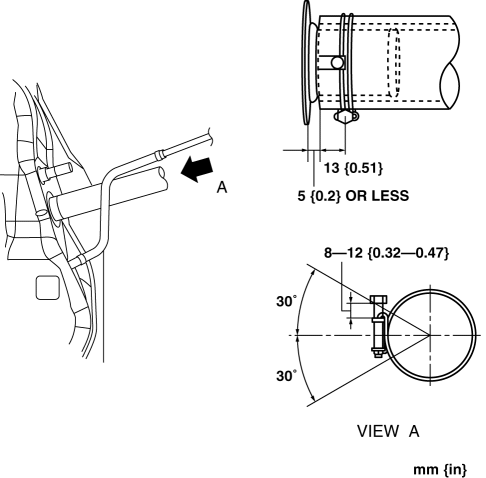
Breather Hose Installation Note
1. Install the breather hose as shown in the figure.
Fuel tank side

Fuel-filler pipe side
Joint Hose Installation Note
1. Install the joint hose and clamp as shown in the figure.
 Fuel Tank Inspection [Mzr 2.0, Mzr 2.5]
WARNING:
Fuel is very flammable liquid. If fuel spills or leaks from the pressurized
fuel system, it will cause serious injury or death and facility breakage. Fuel
can also irritate skin ...
 No.27 Fuel Refill Concerns [Mzr 2.0, Mzr 2.5]
27
FUEL REFILL CONCERNS
DESCRIPTION
Fuel tank does not fill smoothly.
POSSIBLE CAUSE
...
Other materials:
Antenna Feeder No.3 Inspection
4SD (With Audio System (With Display))
1. Disconnect the negative battery cable..
2. Remove the rain sensor cover. (Vehicles with auto light/wiper system).
3. Disconnect the rain sensor connector. (Vehicles with auto light/wiper system)
4. Partially peel back the seaming welts.
5. Remove t ...
Recommended Tire Inflation Pressure
On the tire label you will find the recommended tire inflation pressure in
both kPa and
psi for the tires installed as original equipment on the vehicle. It is very
important that the
inflation pressure of the tires on your vehicle is maintained at the
recommended pressure.
You should che ...
Adjusting the Vents
Directing airflow
To adjust the direction of airflow, move the
adjustment knob.
NOTE
When using the air conditioner under
humid ambient temperature conditions,
the system may blow fog from the vents.
This is not a sign of trouble but a result
of humid air being suddenly cooled.
The ...
