Mazda 3 Service Manual: Instrument Cluster Configuration
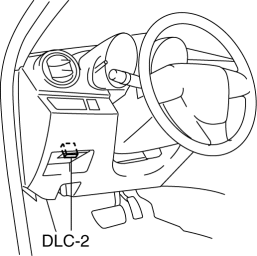
1. Connect the M-MDS (IDS) to the DLC-2.
2. After the vehicle is identified, select the following items from the initialization screen of the IDS.
-
Select the “Module Programming”.
3. Then, select items from the screen menu in the following order.
-
Select “Programmable Module Installation”.
-
Select “IC”.
4. Perform the configuration according to the directions on the screen.
5. Retrieve DTCs by the M-MDS (IDS), then verify that there is no DTC present.
-
If a DTC (s) is detected, perform the applicable DTC inspection..
 Information Display Removal/Installation
CAUTION:
When replacing the information display, the configuration procedure must
be performed before removing the information display. The information display
will not operate normally ...
 Instrument Cluster Disassembly/Assembly
CAUTION:
Do not drop the instrument cluster or damage the printed board. This will
lead to a system malfunction.
1. Perform the instrument cluster configuration when replacing it..
...
Other materials:
Fuel Tank Inspection [Mzr 2.0, Mzr 2.5]
WARNING:
Fuel is very flammable liquid. If fuel spills or leaks from the pressurized
fuel system, it will cause serious injury or death and facility breakage. Fuel
can also irritate skin and eyes. To prevent this, always complete the “Fuel
Line Safety Procedure”, while referring ...
Fuel Filter (High Pressure) Removal/Installation [Mzr 2.0, Mzr 2.5]
WARNING:
Fuel is very flammable liquid. If fuel spills or leaks from the pressurized
fuel system, it will cause serious injury or death and facility breakage. Fuel
can also irritate skin and eyes. To prevent this, always complete the “Fuel
Line Safety Procedure”, while referring ...
Rear Door Checker Removal/Installation
1. Fully close the rear door glass.
2. Disconnect the negative battery cable..
3. Remove the rear door trim..
4. Remove the rear door speaker..
5. Remove the bolt A.
6. Remove the bolts B.
7. Pull out the rear door checker from the rear door speaker installation hole.
8. Insta ...
