Mazda 3 Service Manual: Neutral Switch Removal/Installation [A26 M R]
1. Disconnect the negative battery cable.
2. Disconnect the neutral switch connector.
3. Remove the aerodynamic under cover No.2..
4. Remove the neutral switch with the gasket.
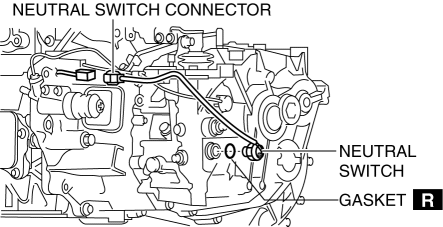
5. Install a new gasket and the neutral switch to the transaxle case.
-
Tightening torque
-
29—39 N·m {3.0—3.9 kgf·m, 22—28 ft·lbf}
6. Install the aerodynamic under cover No.2..
7. Connect the neutral switch connector.
8. Connect the negative battery cable.
 M Position Switch Inspection [Fw6 A EL]
Continuity Inspection
NOTE:
The M position switch is built into the selector lever component.
1. Remove the battery cover..
2. Disconnect the negative battery cable..
3. Remove the ...
 Neutral Switch Removal/Installation [C66 M R]
1. Remove the battery cover..
2. Disconnect the negative battery cable..
3. Remove the aerodynamic under cover No.2..
4. Install in the reverse order of removal.
5. Remove in the order indicat ...
Other materials:
Windshield Wiper And Washer Switch Inspection
1. Disconnect the negative battery cable..
2. Remove the following parts:
a. Front scuff plate (Driver‘s side).
b. Front side trim (Driver‘s side).
c. Hood release lever.
d. Upper panel.
e. Shift knob (MTX).
f. Selector lever knob (ATX).
g. Shift panel.
h. Side wall.
i. Conso ...
Trunk Lid Stay Damper Disposal
NOTE:
The gas in the trunk lid stay damper is colorless, odorless, and non-toxic.
1. Wear protective eye wear.
2. Lay the trunk lid stay damper flat.
3. Hacksaw 2—3 mm {0.08—0.11 in} into the trunk lid stay damper
using a hacksaw, and allow the gas to escape from the trun ...
Rear Door Latch And Lock Actuator Inspection
1. The following actuator and switch are integrated with the rear door latch
and lock actuator. Inspect the rear door latch and lock actuator according to each
inspection procedure for the following items.
Rear door lock actuator.
Rear door latch switch.
Rear door lock-li ...
