Mazda 3 Service Manual: Power Window Main Switch Inspection
1. Disconnect the negative battery cable.
2. Remove the inner garnish. (driver's side).
3. Remove the front door trim. (driver's side).
4. Remove the main switch panel. (driver's side).
5. Connect the power window main switch connector.
6. Connect the negative battery cable..
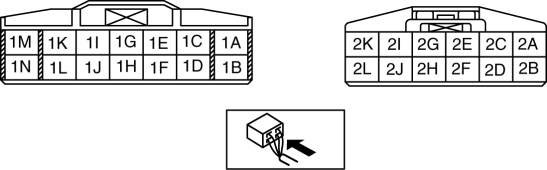
7. Measure the voltage at each terminal.
-
If the voltage is not as specified in the terminal voltage table, inspect the parts under Inspection item (s) and related wiring harnesses.
-
If the system does not work normally even though the inspection items or related wiring harnesses do not have any malfunction, replace the power window main switch.
Terminal Voltage Table (Reference)
|
Terminal |
Signal name |
Connected to |
Measurement condition |
Voltage (V) |
Inspection item (s) |
|
1A |
Sensor ground |
Power window motor (driver’s side) |
Under any condition |
1.0 or less |
|
|
1B |
GND |
Body ground |
Under any condition |
1.0 or less |
|
|
1C |
Rear right side window close signal |
Power window motor (rear right side) |
Door glass (rear right side) closing |
B+ |
|
|
Other |
1.0 or less |
||||
|
1D |
Pulse 1 |
Power window motor (driver’s side) |
Door glass (driver’s side) operating |
5 or less |
|
|
1E |
Rear right side window open signal |
Power window motor (rear right side) |
Door glass (rear right side) opening |
B+ |
|
|
Other |
1.0 or less |
||||
|
1F |
Sensor power supply |
Power window motor (driver’s side) |
Switch the ignition to ON |
5 |
|
|
Switch the ignition to Off |
1.0 or less |
||||
|
1G |
Rear left side window open signal |
Power window motor (rear left side) |
Door glass (rear left side) opening |
B+ |
|
|
Other |
1.0 or less |
||||
|
1H |
Pulse 2 |
Power window motor (driver’s side) |
Door glass (driver’s side) operating |
5 or less |
|
|
1I |
Rear left side window close signal |
Power window motor (rear left side) |
Door glass (rear left side) closing |
B+ |
|
|
Other |
1.0 or less |
||||
|
1J |
Driver’s side window close signal |
Power window motor (driver’s side) |
Door glass (driver’s side) closing |
B+ |
|
|
Other |
1.0 or less |
||||
|
1K |
Door open/close signal |
BCM |
Any door is open |
1.0 or less |
|
|
All door is close |
B+ |
||||
|
1L |
Driver’s side window open signal |
Power window motor (driver’s side) |
Door glass (driver’s side) opening |
B+ |
|
|
Other |
1.0 or less |
||||
|
1M |
IG1 |
|
Switch the ignition to ON |
B+ |
|
|
Switch the ignition to Off |
1.0 or less |
||||
|
1N |
Power supply |
P.WIND 25 A fuse |
Under any condition |
B+ |
|
|
2A |
Power outer mirror (RH) up/down/left/right signal |
Power outer mirror (RH) |
Inspect the power outer mirror switch. (See POWER OUTER MIRROR SWITCH INSPECTION.) |
||
|
2B |
Power outer mirror (LH) left/right signal |
Power outer mirror (LH) |
Inspect the power outer mirror switch. (See POWER OUTER MIRROR SWITCH INSPECTION.) |
||
|
2C |
|
|
Inspect the power outer mirror switch. (See POWER OUTER MIRROR SWITCH INSPECTION.) |
||
|
2D |
Power outer mirror (LH) up/down/left/right signal |
Power outer mirror (LH) |
Inspect the power outer mirror switch. (See POWER OUTER MIRROR SWITCH INSPECTION.) |
||
|
2E |
GND |
Body ground |
Under any condition |
1.0 or less |
|
|
2F |
ACC |
|
Switch the ignition to ACC |
B+ |
|
|
Switch the ignition to Off |
1.0 or less |
||||
|
2G |
— |
— |
— |
— |
— |
|
2H |
Power outer mirror (RH) left/right signal |
Power outer mirror (RH) |
Inspect the power outer mirror switch. (See POWER OUTER MIRROR SWITCH INSPECTION.) |
||
|
2I |
— |
— |
— |
— |
— |
|
2J |
— |
— |
— |
— |
— |
|
2K |
Passenger’s side window open signal |
Power window motor (passenger’s side) |
Door glass (passenger’s side) opening |
B+ |
|
|
Other |
1.0 or less |
||||
|
2L |
Passenger’s side window close signal |
Power window motor (passenger’s side) |
Door glass (passenger’s side) closing |
B+ |
|
|
Other |
1.0 or less |
||||
 Glass Antenna Inspection
4SD
1. Disconnect the negative battery cable..
2. Disconnect the antenna amplifier connector B..
3. Disconnect the antenna feeder No.3 connector C. (with audio unit (with display)).
4. Inspect ...
 Power Window Main Switch Removal/Installation
1. Disconnect the negative battery cable..
2. Remove the inner garnish. (driver's side).
3. Remove the front door trim. (driver's side).
4. Remove the power window main switch..
5. Ins ...
Other materials:
Exhaust System Removal/Installation [Mzr 2.0, Mzr 2.5]
WARNING:
A hot engine and exhaust system can cause severe burns. Turn off the engine
and wait until they are cool before removing the exhaust system.
1. Remove the battery cover..
2. Disconnect the negative battery cable..
3. Remove the plug hole plate..
4. Remove in the order ...
Pictorial index
■ Exterior
Side doors
Locking/unlocking
Opening/closing the side windows
Locking/unlocking by using the mechanical key
Warning messages related to Subaru Solterra door systems
Back door
Locking/unlocking
Opening/closing the back door
Warning messages
Power back door* f ...
Service Cautions
Injury/damage Prevention Precautions
Depending on the vehicle, the cooling fan may operate suddenly even when
the ignition is switched to off. Therefore, keep hands and tools away from the
cooling fan even if the cooling fan is not operating to prevent injury to personnel
or damage t ...
