Mazda 3 Service Manual: Rear Center Speaker Removal/Installation
1. Disconnect the negative battery cable..
2. Remove the following parts:
a. Rear seat cushion.
b. Rear scuff plate.
c. Tire house trim.
d. C-pillar trim.
e. Rear package trim.
3. Remove the screw.
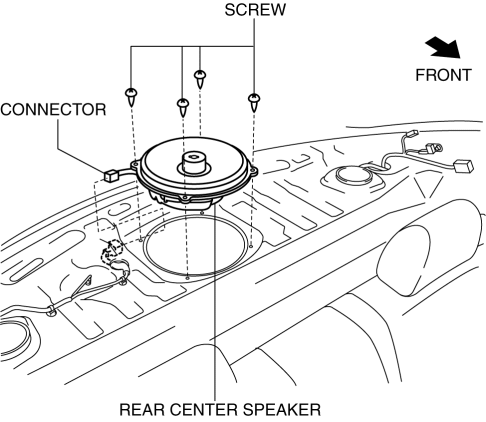
4. Disconnect the connector.
5. Remove the rear center speaker.
6. Install in the reverse order of removal.
 Rear Center Speaker Inspection
1. Disconnect the negative battery cable..
2. Remove the following parts:
a. Rear seat cushion.
b. Rear scuff plate.
c. Tire house trim.
d. C-pillar trim.
e. Rear package trim.
f. Rear c ...
 Rear Door Speaker Inspection
1. Disconnect the negative battery cable..
2. Remove the rear door trim..
3. Remove the rear door speaker..
4. Verify the resistance between the rear door speaker terminals.
If not w ...
Other materials:
Trunk Lid Opener Switch Inspection
1. Disconnect the negative battery cable..
2. Remove the trunk lid trim..
3. Remove the high-mount brake light..
4. Remove the trunk lid opener switch..
5. Verify the continuity of trunk lid opener switch terminals A and B.
6. Verify that the continuity is as indicated in the table.
...
Throttle Position (TP) Sensor Inspection [Mzr 2.0, Mzr 2.5]
Voltage Inspection
CAUTION:
The inspection cannot be performed with this method correctly if there is
a malfunction of the APP sensor or throttle valve actuator. Verify that no DTCs
related to the APP sensor or throttle valve actuator are stored before the inspection.
NOTE:
...
TCM Inspection [FS5 A EL]
NOTE:
The TCM terminal voltage can vary with conditions when measuring and changes
due to age deterioration on the vehicle, causing false diagnosis. Therefore
a comprehensive inspection of the input and output systems, and the TCM is necessary
to determine where the malfunction occu ...
