Mazda 3 Service Manual: Rear Door Checker Removal/Installation
1. Fully close the rear door glass.
2. Disconnect the negative battery cable..
3. Remove the rear door trim..
4. Remove the rear door speaker..
5. Remove the bolt A.

6. Remove the bolts B.
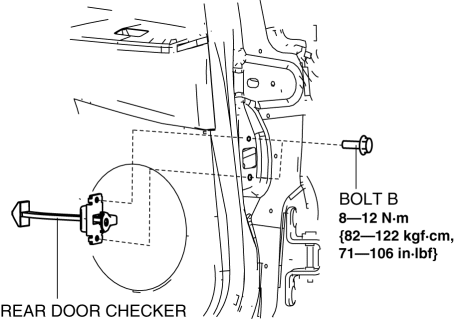
7. Pull out the rear door checker from the rear door speaker installation hole.
8. Install in the reverse order of removal.
 Liftgate Upper Trim Removal/Installation
1. Detach tab while pulling the liftgate upper trim in the direction of the arrow
(1) shown in the figure, then detach clips and pin while pulling in the direction
of the arrow (2).
2. Detac ...
 Rear Door Hinge Removal/Installation
1. Disconnect the negative battery cable..
2. Remove the following parts:
a. Rear door.
b. Front scuff plate.
c. Rear scuff plate.
d. B-pillar lower trim.
3. Remove in the order indicated ...
Other materials:
Oil Control Valve (OCV) Inspection [Skyactiv G 2.0]
Coil Resistance Inspection
1. Remove the battery cover..
2. Disconnect the negative battery cable..
3. Remove the plug hole plate..
4. Disconnect the OCV connector.
5. Measure the resistance between terminals A and B using an ohmmeter.
OCV coil resistance
6.9—7.5 ohms [20°C ...
Clutch Pipe And Hose Removal/Installation [C66 M R]
CAUTION:
Do not allow clutch fluid get on a painted surface. Clutch fluid contains
properties which can dissolve the paint. If clutch fluid gets on a painted surface,
wash it off with water immediately and wipe the area off completely.
1. Remove the battery cover..
2. Disconnec ...
Cooling System Cap Inspection [Mzr 2.0, Mzr 2.5]
WARNING:
Never remove the cooling system cap or loosen the radiator drain plug while
the engine is running, or when the engine and radiator are hot. Scalding engine
coolant and steam may shoot out and cause serious injury. It may also damage
the engine and cooling system.
Tu ...
