Mazda 3 Owners Manual: SRS Air Bag Deployment Criteria
This chart indicates the applicable SRS equipment that will deploy depending on the type of collision.
(The illustrations are the representative cases of collisions.)
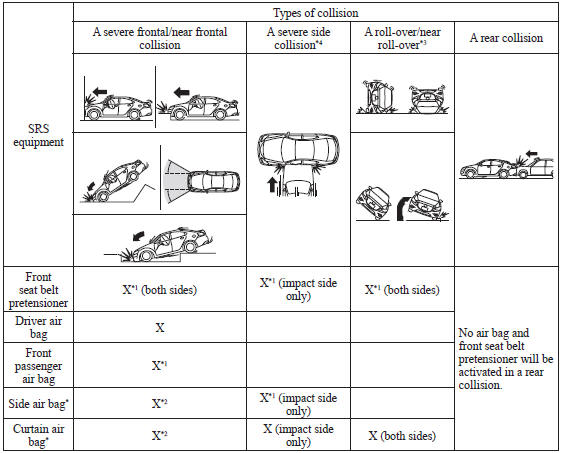
X: The SRS air bag equipment is designed to deploy in a collision.
*1 (With Front Passenger Occupant Classification System) The front passenger front and side air bags and the seat belt pretensioner are designed to deploy depending on the condition of the total seated weight on the front passenger seat.
*2 (With Front Passenger Occupant Classification System) In an angled collision, the side air bag and curtain air bag may deploy.
*3 (With Front Passenger Occupant Classification System) In a roll-over accident, the seat belt pretensioners and the curtain air bags deploy.
*4 (With Side/Curtain Air Bags) In a side collision, the seat belt pretensioners and the side/curtain air bags deploy (only on the side in which the collision occurs).
 How the SRS Air Bags Work
Your Mazda is equipped with the following types of SRS air bags. SRS air bags
are
designed to work together with the seat belts to help to reduce injuries during
an accident.
The SRS air bags ...
 Limitations to SRS Air Bag
In severe collisions such as those described previously in "SRS Air Bag
Deployment
Criteria", the applicable SRS air bag equipment will deploy. However, in some
accidents,
the equipmen ...
Other materials:
Oil Cooler Removal/Installation [FS5 A EL]
1. Remove the battery cover..
2. Disconnect the negative battery cable.
3. Remove the air cleaner component..
4. Remove the aerodynamic under cover NO.2..
5. Drain the ATF..
6. Drain the engine coolant..
7. Remove in the order indicated in the table.
1
Water ...
Auxiliary Jack/Usb Port Removal/Installation
1. Disconnect the negative battery cable..
2. Remove the following parts:
a. Upper panel.
b. Shift lever knob (MTX).
c. Selector lever knob (ATX).
d. Shift panel.
e. Side wall.
f. Console.
3. Remove the auxiliary jack/USB port in the direction of the arrow (2) shown
in the figure w ...
Schedule 2
U.S.A. (severe driving conditions) and Puerto Rico residents
Chart symbols:
I: Inspect: Inspect and clean, repair, adjust, fill up, or replace if
necessary.
R: Replace
L : Lubricate
T: Tighten
Remarks:
*1 Engine oil flexible maintenance is available for U.S.A. and Puerto Rico
resi ...
