Mazda 3 Service Manual: Auxiliary Jack/Usb Port Removal/Installation
1. Disconnect the negative battery cable..
2. Remove the following parts:
a. Upper panel.
b. Shift lever knob (MTX).
c. Selector lever knob (ATX).
d. Shift panel.
e. Side wall.
f. Console.
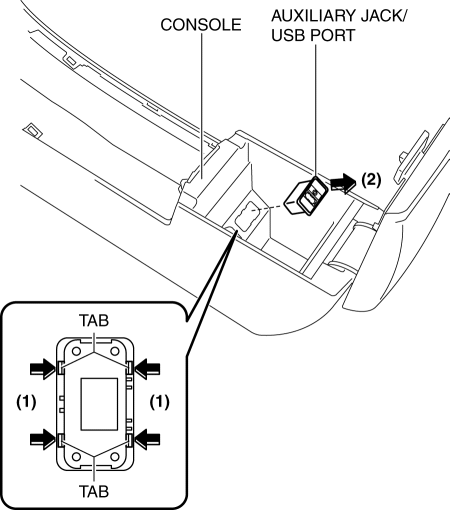
3. Remove the auxiliary jack/USB port in the direction of the arrow (2) shown in the figure while pressing the auxiliary jack/USB port tabs in the direction of the arrow (1).
4. Install in the reverse order of removal.
 Auxiliary Jack/Usb Port Inspection
Auxiliary jack inspection
1. Disconnect the negative battery cable..
2. Remove the following parts:
a. Upper panel.
b. Shift lever knob (MTX).
c. Selector lever knob (ATX).
d. Shift panel. ...
 Bass Box Inspection
1. Disconnect the negative battery cable..
2. Disconnect the connector..
3. Verify the resistance between bass-box terminals.
If not within the specification, replace the bass-box.
...
Other materials:
Interior Equipment (View A)
Door-lock knob
Turn and lane-change signal
Lighting control
Wiper and washer lever
DSC OFF switch
Tire pressure monitoring system set switch
LDWS switch
AFS OFF switch
BSM OFF switch
Headlight leveling switch
Outside mirror switch
Door-lock switch
Power window lock s ...
Trunk Lid Adjustment
1. Measure the gap and height difference between the trunk lid and the body.
Standard clearance
a: 2.4—4.4 mm {0.10—0.17 in}
b: -4.6—-2.6 mm {-0.18—-0.11 in}
c: 2.5—4.5 mm {0.10—0.17 in}
d: -1.7—0.3 mm {-0.06—0.01 in}
e: 2.6—4.6 mm {0. ...
Seat Weight Sensor Control Module Removal/Installation [Two Step Deployment
Control System]
CAUTION:
When the seat weight sensor control module is replaced with a new one, perform
the seat weight sensor calibration using the M–MDS..
1. Switch the ignition to off.
2. Disconnect the negative battery cable and wait for 1 min or more..
3. Disconnect the connectors.
...
