Mazda 3 Service Manual: Rear Door Removal/Installation
WARNING:
-
Removing the rear door without supporting it could cause the rear door to fall and cause serious injury. Always perform the procedure with at least another person to prevent the rear door from falling.
1. Disconnect the negative battery cable..
2. Remove in the order indicated in the table.
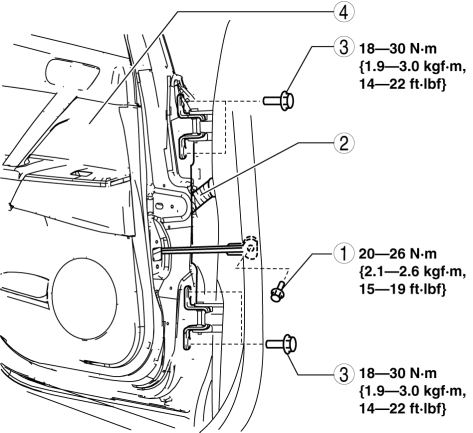
|
1 |
Bolt A |
|
2 |
Connector (See Connector Removal Note.) |
|
3 |
Bolt B |
|
4 |
Rear door |
3. Install in the reverse order of removal.
4. Adjust the rear door..
Connector Removal Note
1. While pressing the tab in the direction of arrow (1), disconnect the connector in the direction of arrow (2).

 Rear Door Pad Removal/Installation
1. Fully open the rear door glass.
2. Disconnect the negative battery cable..
3. Remove the following parts:
a. Rear door trim.
b. Rear door speaker.
c. Rear power window motor.
d. Rear do ...
 Rear Outer Handle Removal/Installation
1. Fully close the rear door glass.
2. Disconnect the negative battery cable..
3. Remove the rear door trim..
4. Remove the service hole cover.
5. Remove the screw from the service hole.
...
Other materials:
Relay Inspection [Skyactiv G 2.0]
Relay Type
Connector type
Part name
Type A
Front fog light relay
Headlight relay (HI)
Headlight relay (LO)
Horn relay
TNS relay
A/C relay
Start ...
Rear Upper Arm Removal/Installation
1. When working on the right side of the vehicle, disconnect the canister vent
(CV) solenoid valve from the rear crossmember. (MZR 2.0 (Except Mexico), SKYACTIV-G
2.0, MZR 2.3 DISI Turbo, MZR 2.5 (Except Mexico))
2. Remove in the order indicated in the table.
3. Install in the reverse or ...
Washer Motor Inspection
1. Disconnect the negative battery cable..
2. Remove the front mudguard (RH)..
3. Disconnect the washer motor connector.
4. After connecting washer motor terminal A to the positive battery terminal,
and terminal B to the negative battery terminal, verify that washer fluid flows
to the wind ...
