Mazda 3 Service Manual: Rear Scuff Plate Removal/Installation
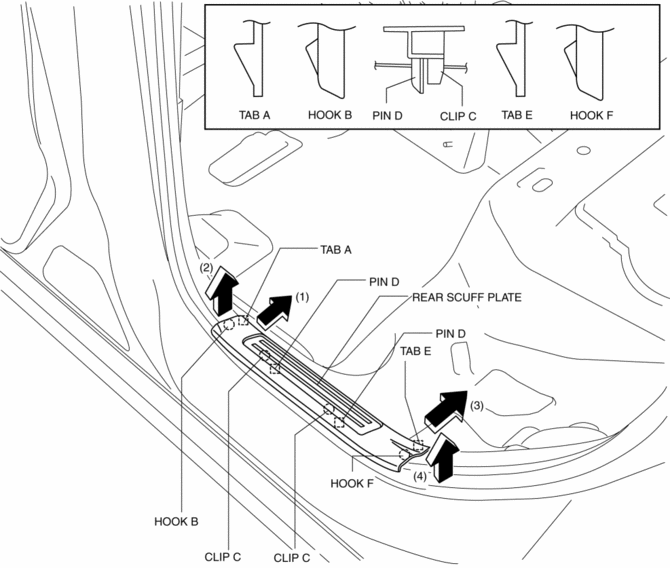
1. Detach tab A while pulling the rear scuff plate in the direction of the arrow (1) shown in the figure, then detach hook B, clips C, pins D while pulling in the direction of the arrow (2).
2. Detach tab E while pulling the rear scuff plate in the direction of the arrow (3) shown in the figure, pull the rear scuff plate in the direction of the arrow (4) shown in the figure.
3. Remove the rear scuff plate.
4. Install in the reverse order of removal.
 Rear Package Trim Removal/Installation
1. Remove the following parts:
a. Rear seat cushion.
b. Rear scuff plate.
c. Tire house trim.
d. C-pillar trim.
2. Fold the rear seat back.
3. Remove the fasteners.
4. Pull up the re ...
 Shift Panel Removal/Installation
ATX
1. Remove the upper panel..
2. Remove the selector lever knob..
3. Pull the shift panel in the direction of the arrow shown in the figure and
remove it while detaching the clips A, hook B a ...
Other materials:
Combination Switch Disassembly/Assembly
CAUTION:
Handling the air bag module improperly can accidentally deploy the air bag
module, which may seriously injure you. Read the air bag system service warnings
and cautions before handling the air bag module..
1. Switch the ignition to off.
2. Disconnect the negative batte ...
Personalization Features
The following personalization features can be set or changed by an Authorized
Mazda
Dealer. Consult an Authorized Mazda Dealer for details.
Additionally, some of the personalization features can be changed by the
customer
depending on the feature.
Personalization features which can be ch ...
Sunroof Motor Removal/Installation
1. Disconnect the negative battery cable..
2. Remove the rain sensor cover. (Vehicles with auto light/wiper system).
3. Disconnect the rain sensor connector. (Vehicles with auto light/wiper system)
4. Partially peel back the seaming welts.
5. Remove the following parts:
a. Sunroof seaming ...
