Mazda 3 Service Manual: Solenoid Valve Removal/Installation [FS5 A EL]
WARNING:
-
A hot transaxle and ATF can cause severe burns. Turn off the engine and wait until they are cool.
Primary Control Valve Body
1. Remove the primary control valve body.
a. Remove the battery cover..
b. Disconnect the negative battery cable.
c. Remove the aerodynamic under cover NO.2..
d. Clean the transaxle exterior throughout with a steam cleaner or cleaning solvents.
e. Drain the ATF..
f. Remove the oil pan..
g. Remove the primary control valve body..
2. Remove in the order indicated in the table.
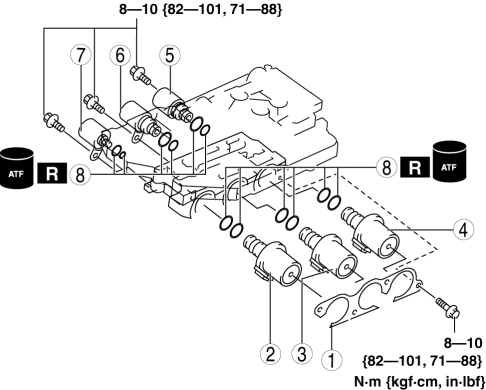
|
1 |
Bracket |
|
2 |
Shift solenoid A |
|
3 |
Shift solenoid C |
|
4 |
Shift solenoid B |
|
5 |
Shift solenoid E |
|
6 |
Shift solenoid D |
|
7 |
Pressure control solenoid A |
|
8 |
O-ring |
3. Install in the reverse order of removal.
4. Add the ATF..
5. Perform the “Mechanical System Test”..
6. Perform the “Road Test”..
Secondary Control Valve Body
1. Remove the secondary control valve body.
a. Remove the battery cover..
b. Disconnect the negative battery cable.
c. Remove the battery component (ex: battery, battery tray and PCM component)..
d. Remove the aerodynamic under cover NO.2..
e. Clean the transaxle exterior throughout with a steam cleaner or cleaning solvents.
f. Drain the ATF..
g. Remove the oil cover..
h. Remove the secondary control valve body..
2. Remove in the order indicated in the table.
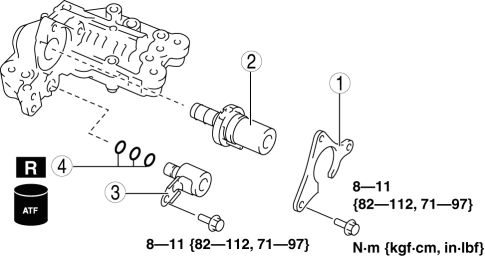
|
1 |
Bracket |
|
2 |
Pressure control solenoid B |
|
3 |
Shift solenoid F |
|
4 |
O-ring |
3. Install in the reverse order of removal.
4. Add the ATF..
5. Perform the “Mechanical System Test”..
6. Perform the “Road Test”..
 Solenoid Valve Inspection [FS5 A EL]
CAUTION:
Water or foreign objects entering the connector can cause a poor connection
or corrosion. Be sure not to drop water or foreign objects on the connector
when disconnecting it.
...
 Starter Interlock Switch Inspection [Mzr 2.0, Mzr 2.5]
CAUTION:
Do not reuse the starter interlock switch if it is removed from the vehicle
even once. Replace with a new starter interlock switch when installing.
1. Remove the battery cove ...
Other materials:
No.6 Bsm Indicator Light Flashes While Not Under Bsm Indicator Light Flashing
Conditions (No Combination Switch Operation (Turn Signal Switch)) [Blind Spot Monitoring
(Bsm)]
6
BSM indicator light flashes while not under BSM indicator light-flashing
conditions (no combination switch operation (turn signal switch)
Description
The BSM indicator light flashes despite not satisfying the BSM indicator
l ...
Liftgate Adjustment
1. Measure the gap and height difference between the liftgate and the body.
2. Loosen the liftgate hinge installation bolts and adjust the gap by moving
the liftgate.
Standard clearance
a: 5.0―7.0 mm {0.20―0.27 in}
b: -2.0―0 mm {-0.078―0 in}
...
Vehicle Speed Sensor (VSS) Inspection [FS5 A EL]
On-Vehicle Inspection
1. Inspect the power supply circuit for the VSS.
a. Remove the insulator from the transaxle.
b. Disconnect the VSS connector.
c. Switch the ignition to ON (engine off).
d. Measure the voltage at VSS connector terminal A (harness-side).
If there is a ...
