Mazda 3 Service Manual: Transaxle Oil Replacement [G66 M R]
1. Park the vehicle on level ground.
2. Remove the aerodynamic under cover No.2..
3. Remove the drain plug and washer.
4. Drain the oil into a suitable container.
5. Install a new washer and the drain plug.
-
Tightening torque
-
39—59 N·m {4.0—6.0 kgf·m, 29—43 ft·lbf}
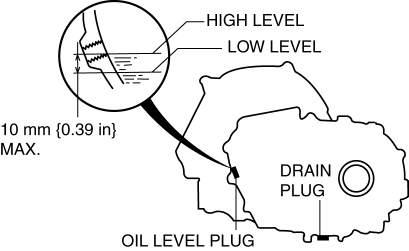
6. Remove the oil level plug and washer.
7. Add the specified amount and type of oil through the oil level plug hole until the level reaches the bottom of the oil level plug hole. Manual transaxle oil
|
Item |
Specification |
|
Grade |
API service GL-4 |
|
Viscosity |
SAE 75W-80 |
|
Capacity (approx. quantity) |
2.85 L {3.01 US qt, 2.51 lmp qt} |
8. Install a new washer and the oil level plug.
-
Tightening torque
-
39—59 N·m {4.0—6.0 kgf·m, 29—43 ft·lbf}
9. Install the aerodynamic under cover No.2..
 Transaxle Oil Replacement [G35 M R]
1. Park the vehicle on level ground.
2. Remove the aerodynamic under cover No.2..
3. Remove the drain plug and washer.
4. Drain the oil into a suitable container.
5. Install a new washer a ...
 Oil Pressure Switch Inspection
MZR 2.0, MZR 2.5, MZR 2.3 DISI Turbo
WARNING:
A hot engine can cause severe burns. Turn off the engine and wait until it
is cool before removing the exhaust system.
1. Disconnect the ...
Other materials:
Camshaft Position (CMP) Sensor Removal/Installation [Mzr 2.0, Mzr 2.5]
CAUTION:
When replacing the CMP sensor, make sure there is no foreign material on
it such as metal shavings. If it is installed with foreign material, the sensor
output signal will malfunction resulting from fluctuation in magnetic flux and
cause a deterioration in engine control.
...
Operating the Satellite Radio
What is satellite radio?
With over 130 channels, SiriusXM
Satellite Radio brings you more of what
you love. Get channels and channels of
commercial-free music, plus sports, news,
talk, entertainment and more.
Commercial-free music from nearly
every genre — rock to pop, hip-hop to
country ...
Discharge Headlight Service Warnings
Discharge Headlight Service Warnings
To prevent electrical shock when replacing the discharge headlight bulb,
always perform the servicing with dry hands and in an area where it does not
get wet.
Never probe the discharge headlight bulb connector directly with a finger
o ...
