Mazda 3 Service Manual: Trunk Side Upper Trim Removal/Installation
1. Remove the rear seat cushion..
2. Remove the rear scuff plate..
3. Remove the tire house trim..
4. Open the cap.
5. Remove the screw.
6. Remove the fasteners.
7. Pull the trunk side upper trim in the direction of arrow, then detach the hooks and clips.
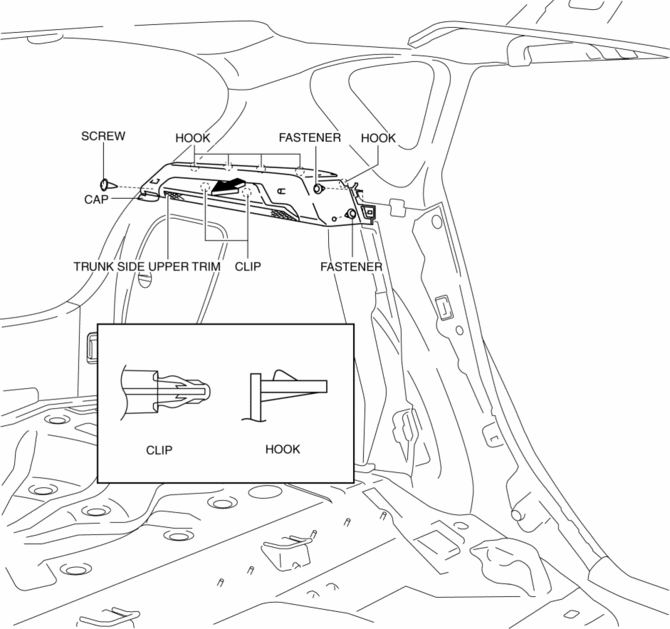
8. Install in the reverse order of removal.
 Trunk Side Trim Removal/Installation
4SD
Left-side
1. Remove the following parts:
a. Rear scuff plate.
b. Tire house trim.
c. Trunk mat.
d. Trunk board.
e. Trunk end trim.
f. Service hole cover
2. Remove the fasteners.
...
 Trunk Lid Opener Switch Inspection
1. Disconnect the negative battery cable..
2. Remove the trunk lid trim..
3. Remove the high-mount brake light..
4. Remove the trunk lid opener switch..
5. Verify the continuity of trunk lid o ...
Other materials:
Cleaning the Upholstery and
Interior Trim
Vinyl
Remove dust and loose dirt from vinyl
with a whisk broom or vacuum cleaner.
Clean vinyl with a leather-and-vinyl
cleaner.
Leather *
Remove dust and sand first using a
vacuum cleaner or other means, then wipe
dirt off using a soft cloth with a leather
cleaner or a soft cloth soaked i ...
Jack
To remove the jack
(4–Door)
Push the tabs and remove the cover.
(5–Door)
Turn the knob and remove the cover.
Turn the wing bolt and jack screw
counterclockwise.
To secure the jack
Insert the wing bolt into the jack with
the jack screw pointing to the down
a ...
Trunk Lid Opener Switch Inspection
1. Disconnect the negative battery cable..
2. Remove the trunk lid trim..
3. Remove the high-mount brake light..
4. Remove the trunk lid opener switch..
5. Verify the continuity of trunk lid opener switch terminals A and B.
6. Verify that the continuity is as indicated in the table.
...
